
WebinarKit comes built-in with a variety of 3rd party app integrations. This means you can easily do things like send registrant details to your CRM/email platform of choice when someone registers for your webinar. WebinarKit also supports advanced segmentation. For example, you can segment registrants between those that attended your event and those that did not, and assign those registrants to different lists or assign different tags to them.
Each 3rd party integration we support is a little different in the way they handle creating new contacts, so find the integration you're using from the list below, and read on to learn any specific details that might be required for your integration.
Connect a 3rd party app with your WebinarKit account
Before using a 3rd party integration with WebinarKit, you'll need to connect your WebinarKit account to that app. You can connect the app you want via the settings page of your WebinarKit account. You can use the following link to access the integration settings: https://webinarkit.com/settings#integration
Sending registrants their event information
If you're using a 3rd party CRM/email platform with WebinarKit, you probably want to send a few emails to your registrants reminding them to show up for your events. Thankfully, WebinarKit makes this super easy. Whenever a registrant is added to one of the integrations you are using, WebinarKit passes along that registrant's event link, replay link (if applicable for your event), and the date/time that they registered for.
This way, you can easily include those details in your custom reminder/follow up emails to ensure maximum attendance rates.
ActiveCampaign
WebinarKit's integration with ActiveCampaign allows you to add event registrants to ActiveCampaign lists and/or apply a tag based on a large variety of different events (Example: Registered for event, attended/did not attend event, clicked on event offer, etc...).
WebinarKit also sends along the registrant's event/replay link and event date/time. The date is sent across in 2 formats (the "text format" which is essentially the date the registrant selected including their local time zone) AND in a "date time" format (a format that can be read/manipulated inside ActiveCampaign).
IMPORTANT: In order to receive the registrant's unique event/replay link and event date/time, WebinarKit will automatically add the fields to your account when you first set up your integration. However, YOU must add the fields to any relevant lists you are using in order to use them when sending emails. Please see the screenshots below for examples on how to do this:
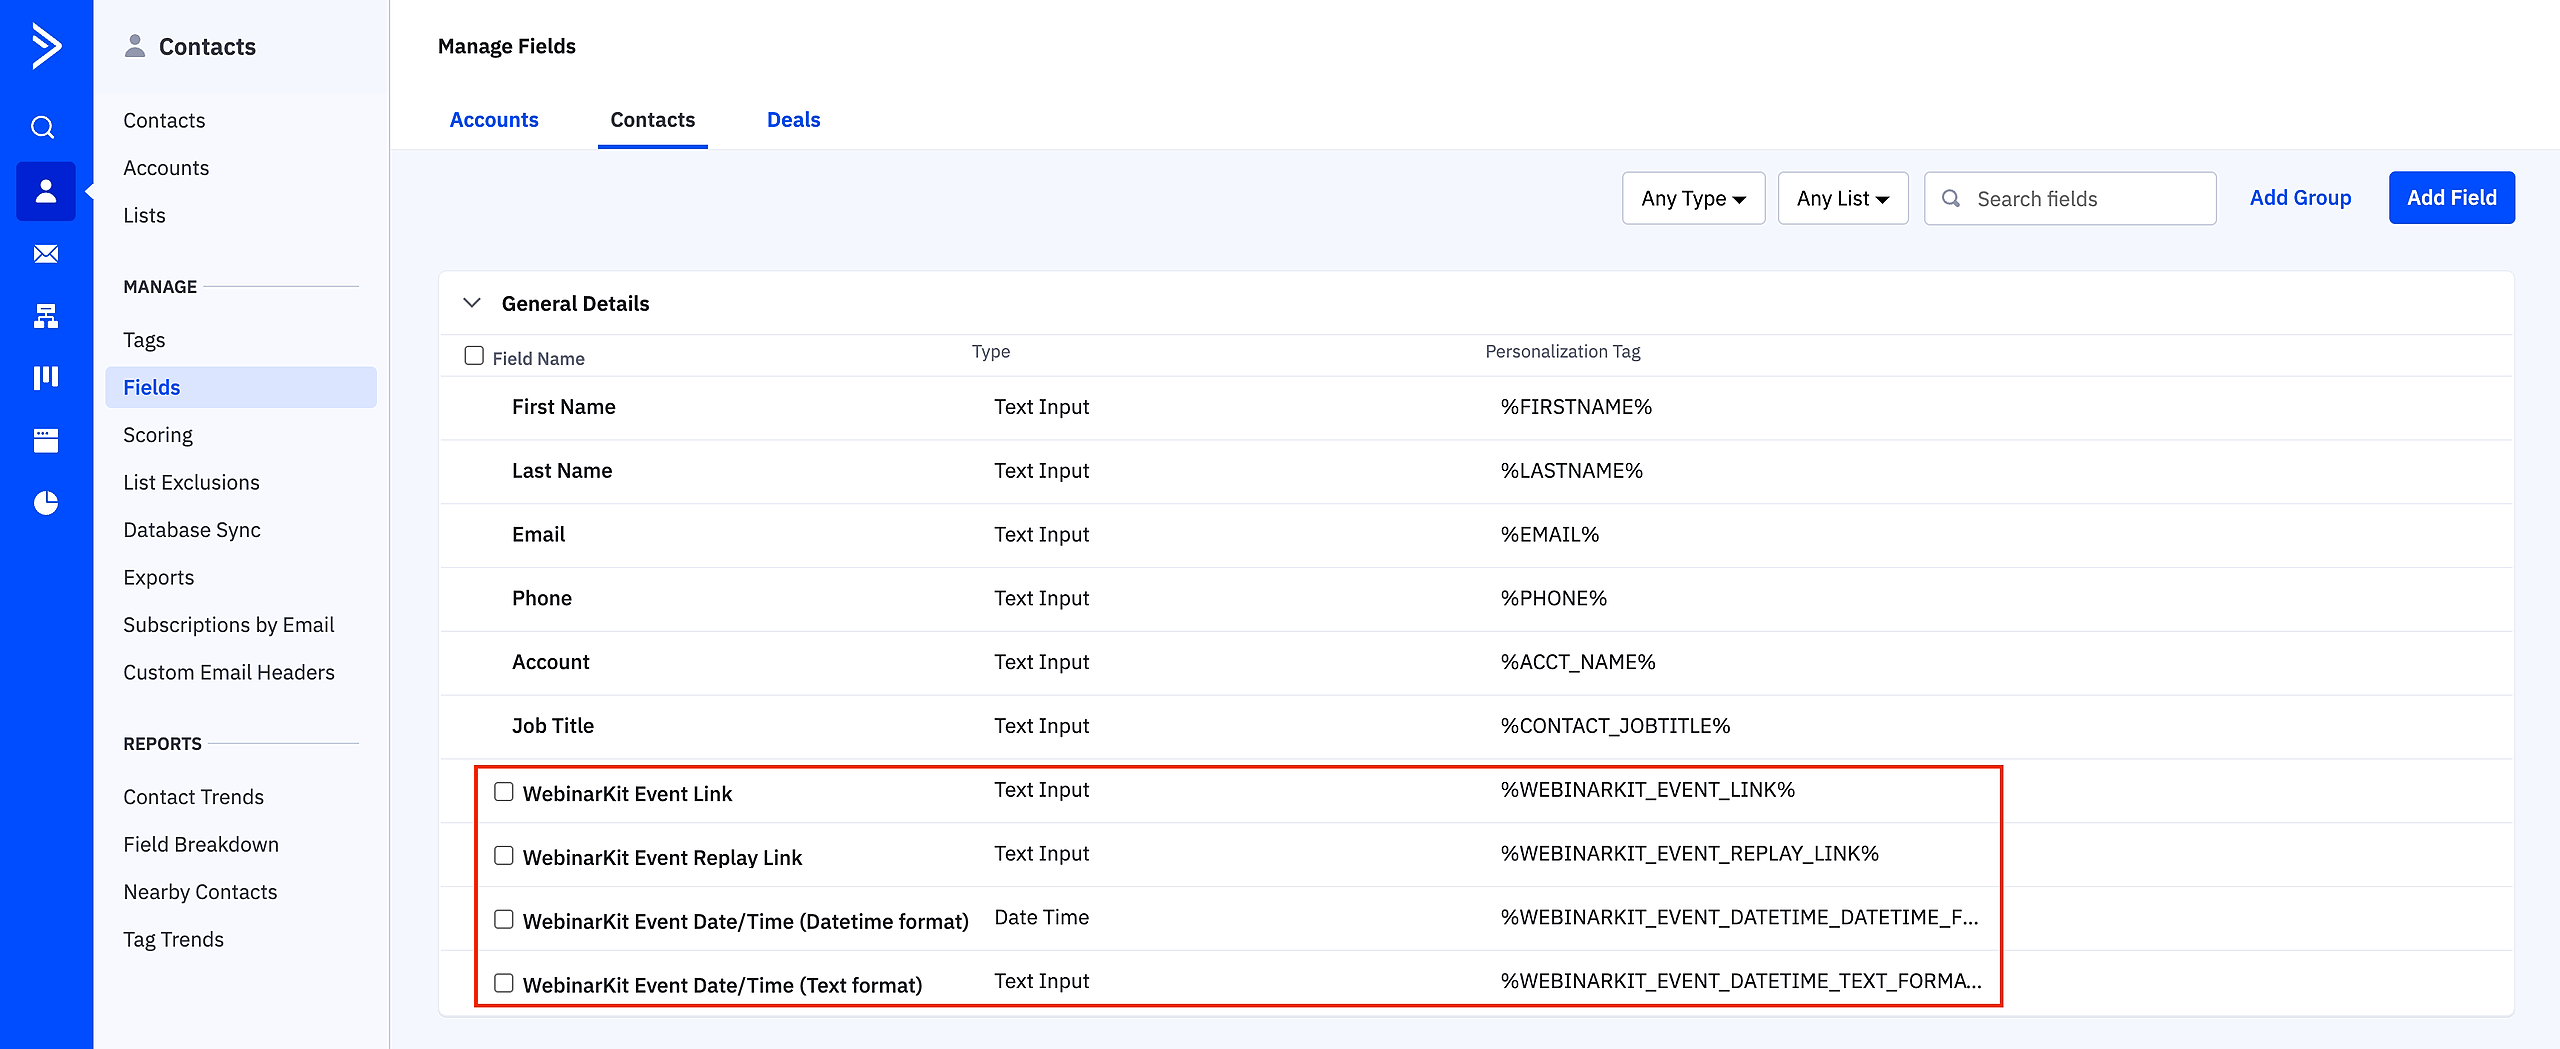

Please see ActiveCampaign's custom fields article here for more information on how to do this: https://www.activecampaign.com/learn/videos/managing-custom-fields
After you have added these custom fields to your relevant ActiveCampaign lists, you will be able to use them in your own custom reminder/follow up emails.
Aweber
WebinarKit's integration with Aweber allows you to add event registrants to Aweber lists and also optionally tag them based on a large variety of different events (Example: Registered for event, attended/did not attend event, clicked on event offer, etc...).
WebinarKit also sends along the registrant's event/replay link and event date/time.
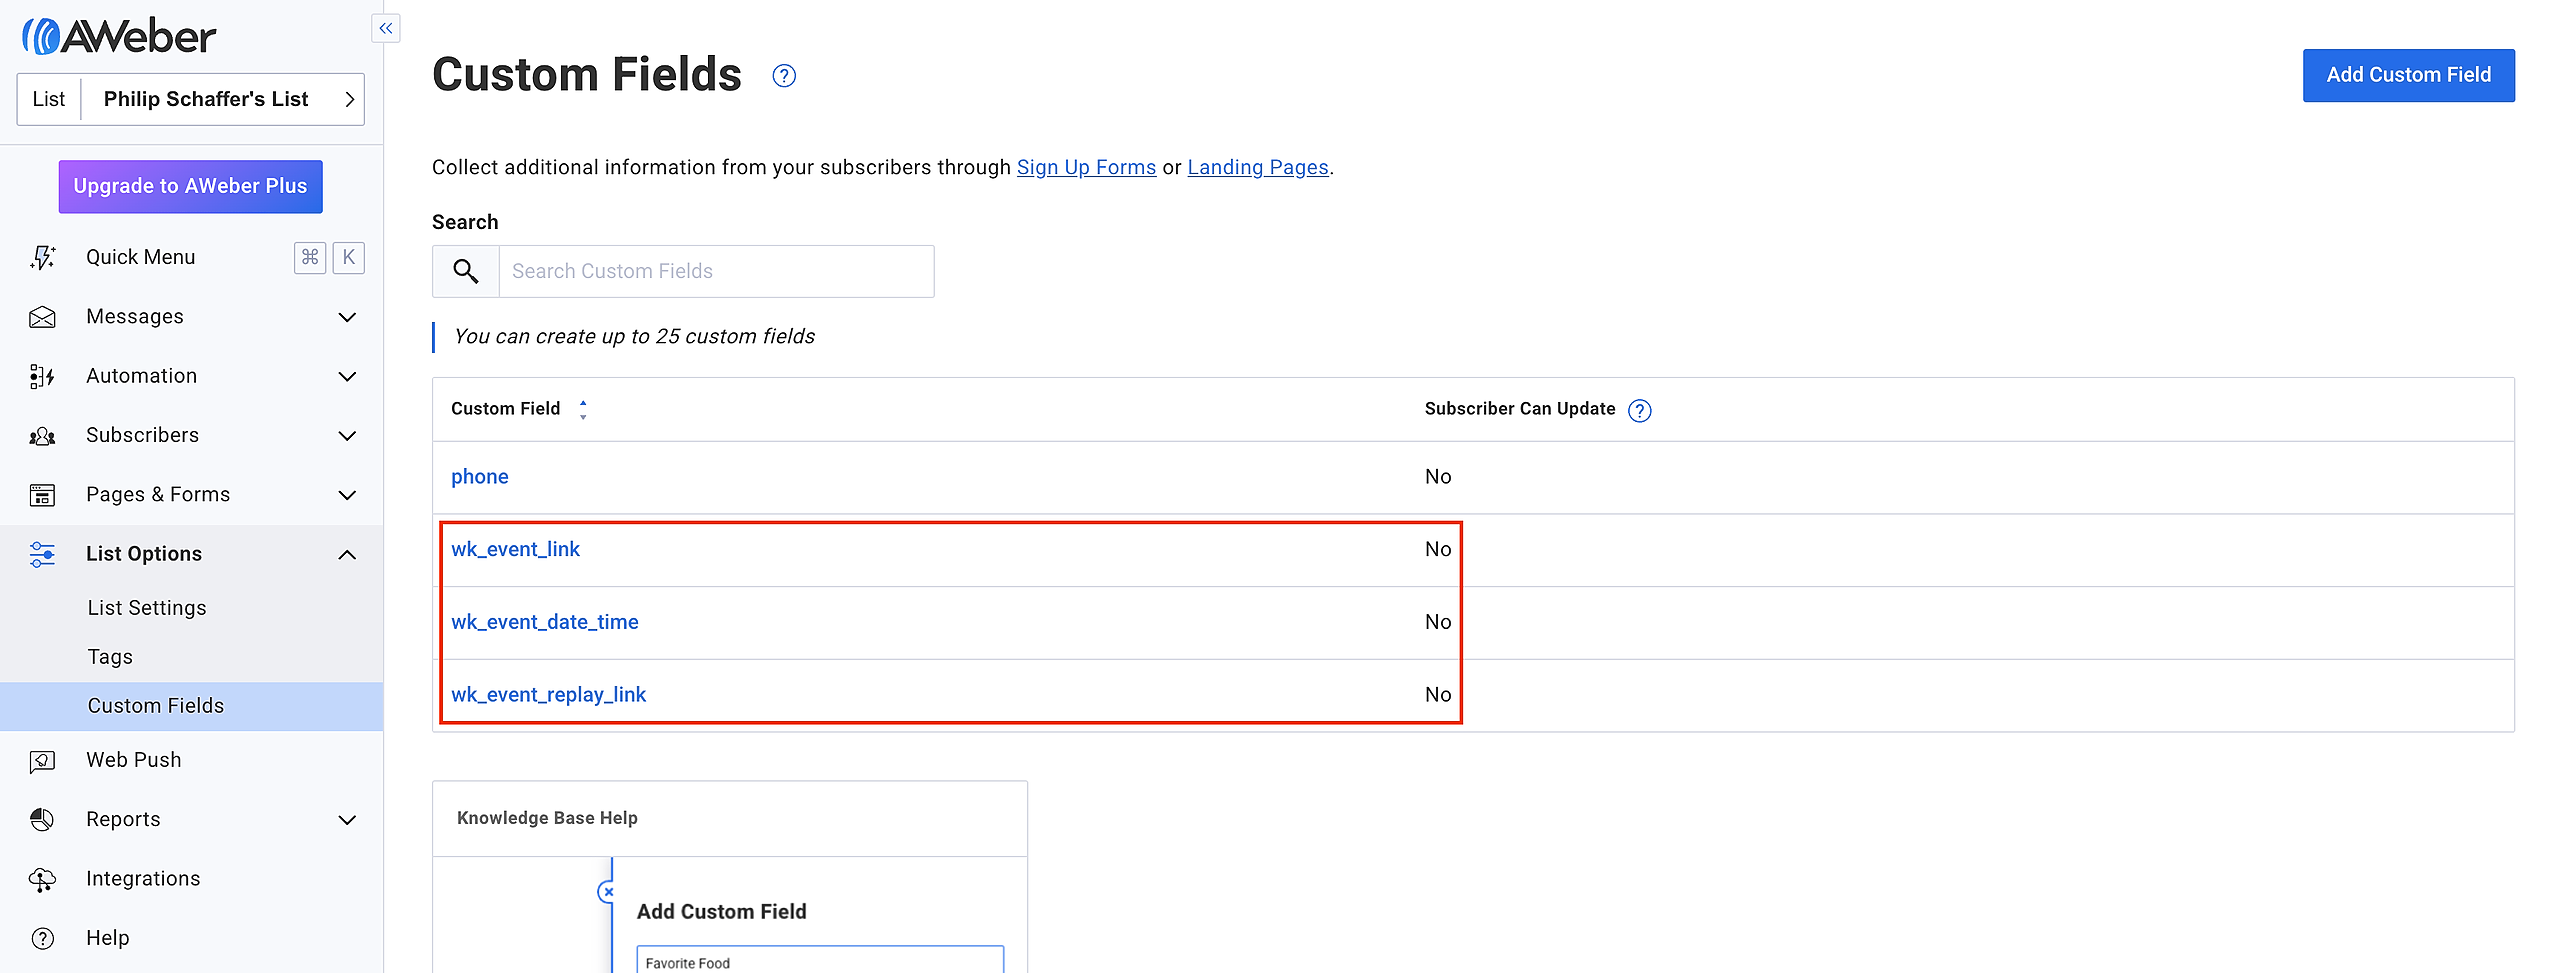
IMPORTANT: In order to receive the registrant's unique event/replay link and event date/time, you MUST add 3 custom fields to the lists you are using in Aweber. You must add the following 3 custom fields:
wk_event_link
wk_event_replay_link
wk_event_date_time
You must add the custom fields in your Aweber list settings as shown in the screenshot below. The relevant sections are highlighted in red.
Please see Aweber's custom fields article here for more information on how to do this: https://help.aweber.com/hc/en-us/articles/204027516-How-do-I-create-custom-fields-
After you have added these custom fields to your relevant Aweber lists, you will be able to use them in your own custom reminder/follow up emails.
Brevo
WebinarKit's integration with Brevo allows you to subscribe event registrants to Brevo lists based on a large variety of different events (Example: Registered for event, attended/did not attend event, clicked on event offer, etc...).
WebinarKit also sends along the registrant's event/replay link and event date/time.
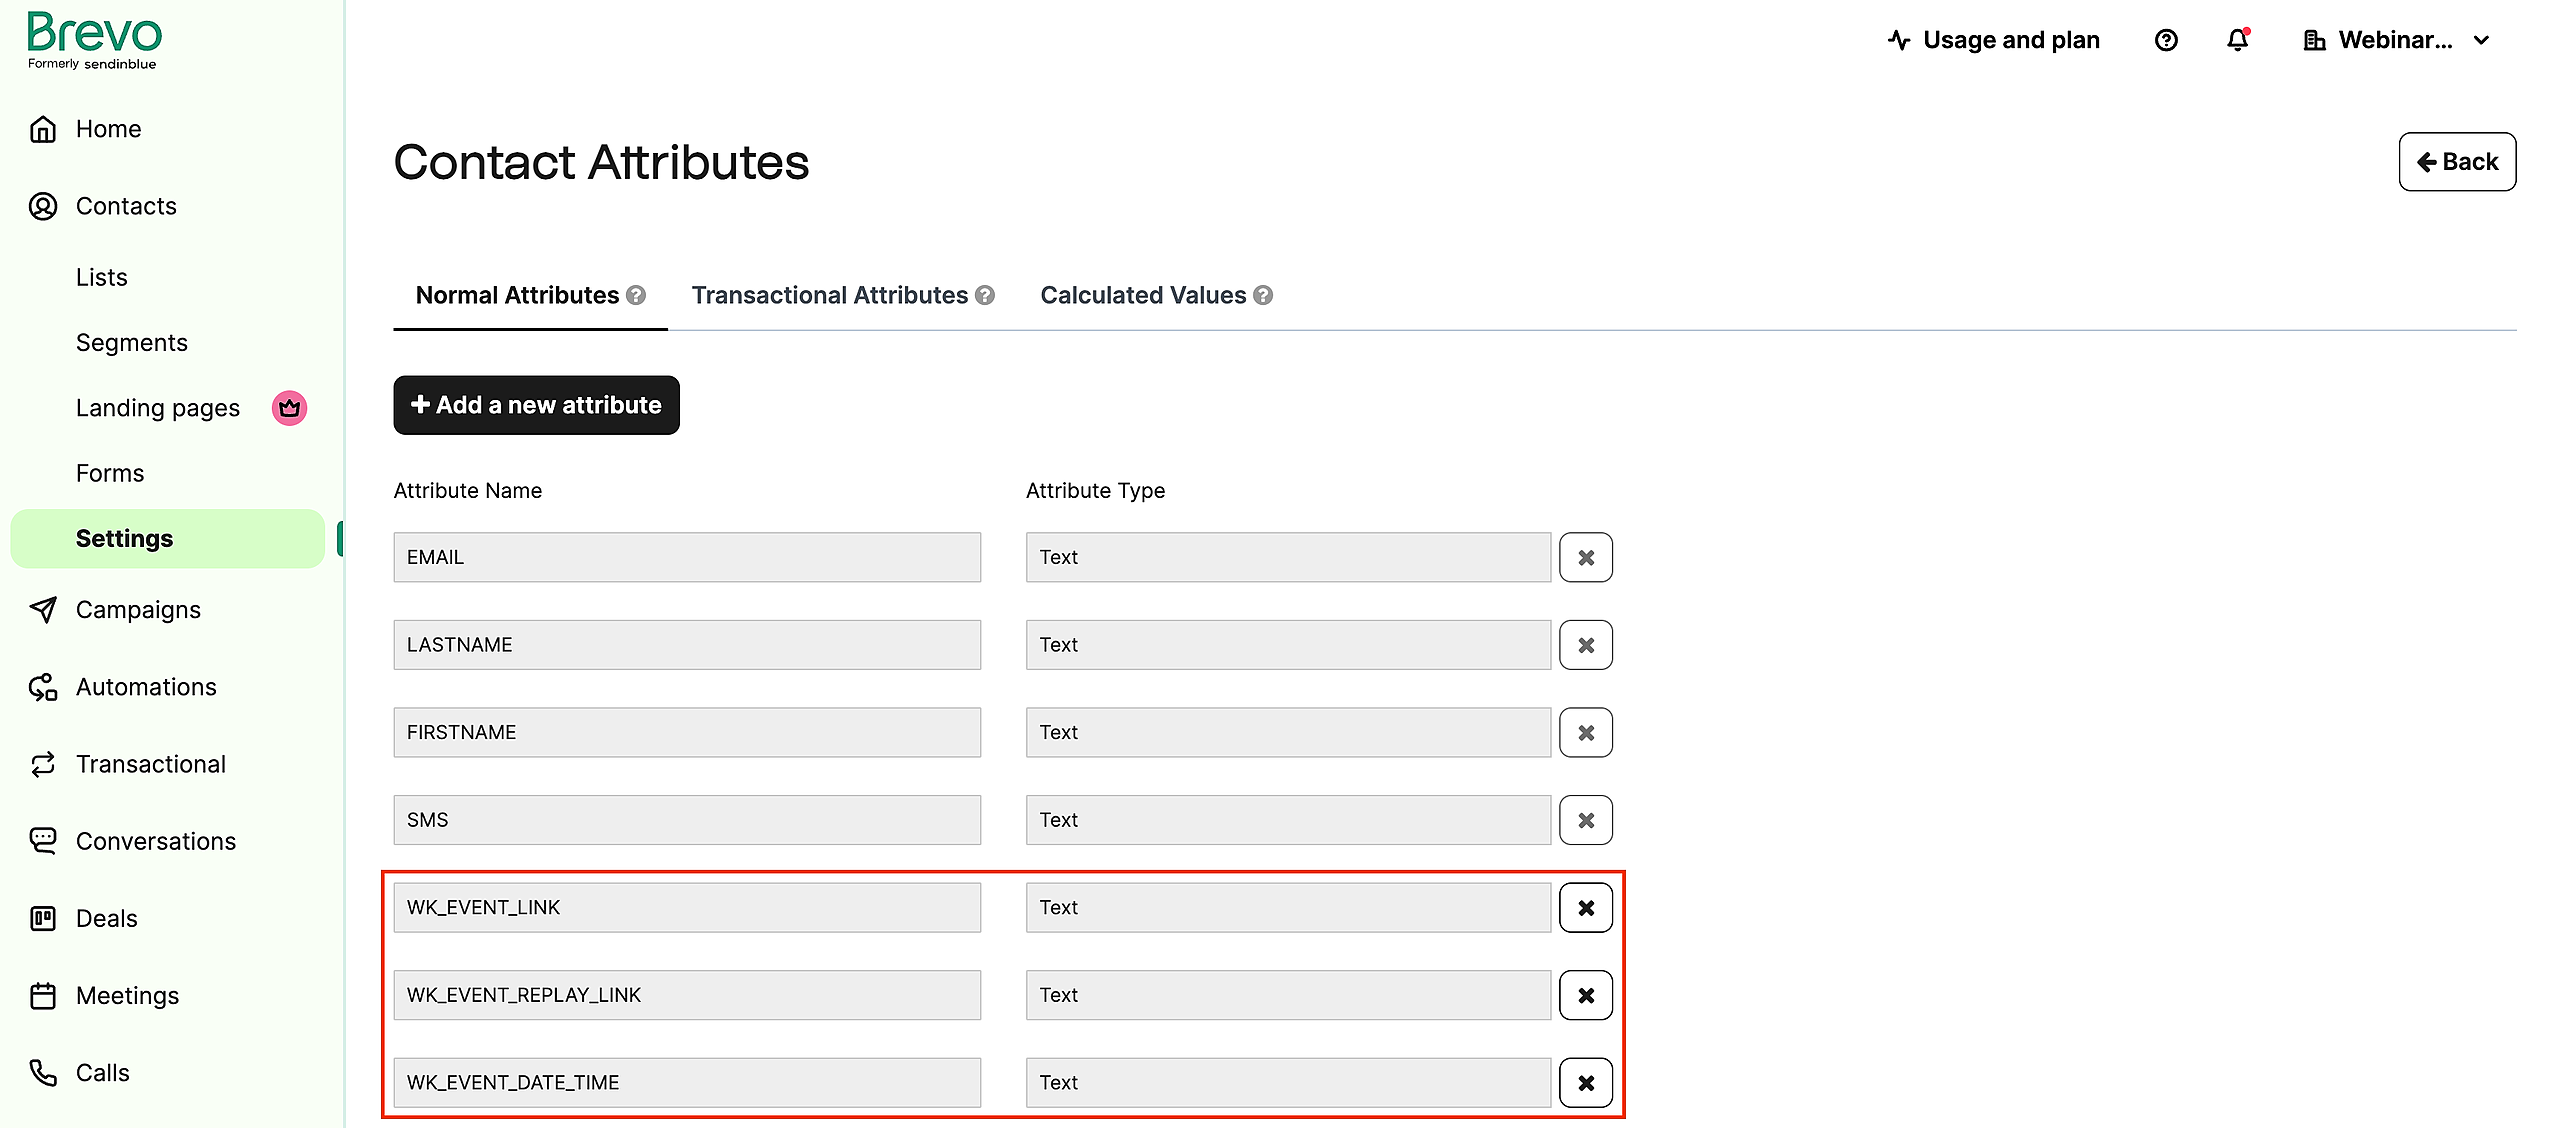
IMPORTANT: In order to receive the registrant's unique event/replay link and event date/time, you MUST add 3 custom contact attributes to your Brevo account. You must add the following contact attributes:
WK_EVENT_LINK
WK_EVENT_REPLAY_LINK
WK_EVENT_DATE_TIME
Please see the screenshot below and the "Add a new attribute" button highlighted in red to see how you can do this:
Campaign Refinery
WebinarKit's integration with Campaign Refinery allows you to add event registrants to Campaign Refinery forms and/or apply a tag based on a large variety of different events (Example: Registered for event, attended/did not attend event, clicked on event offer, etc...).
WebinarKit also sends along the registrant's event/replay link and event date/time.
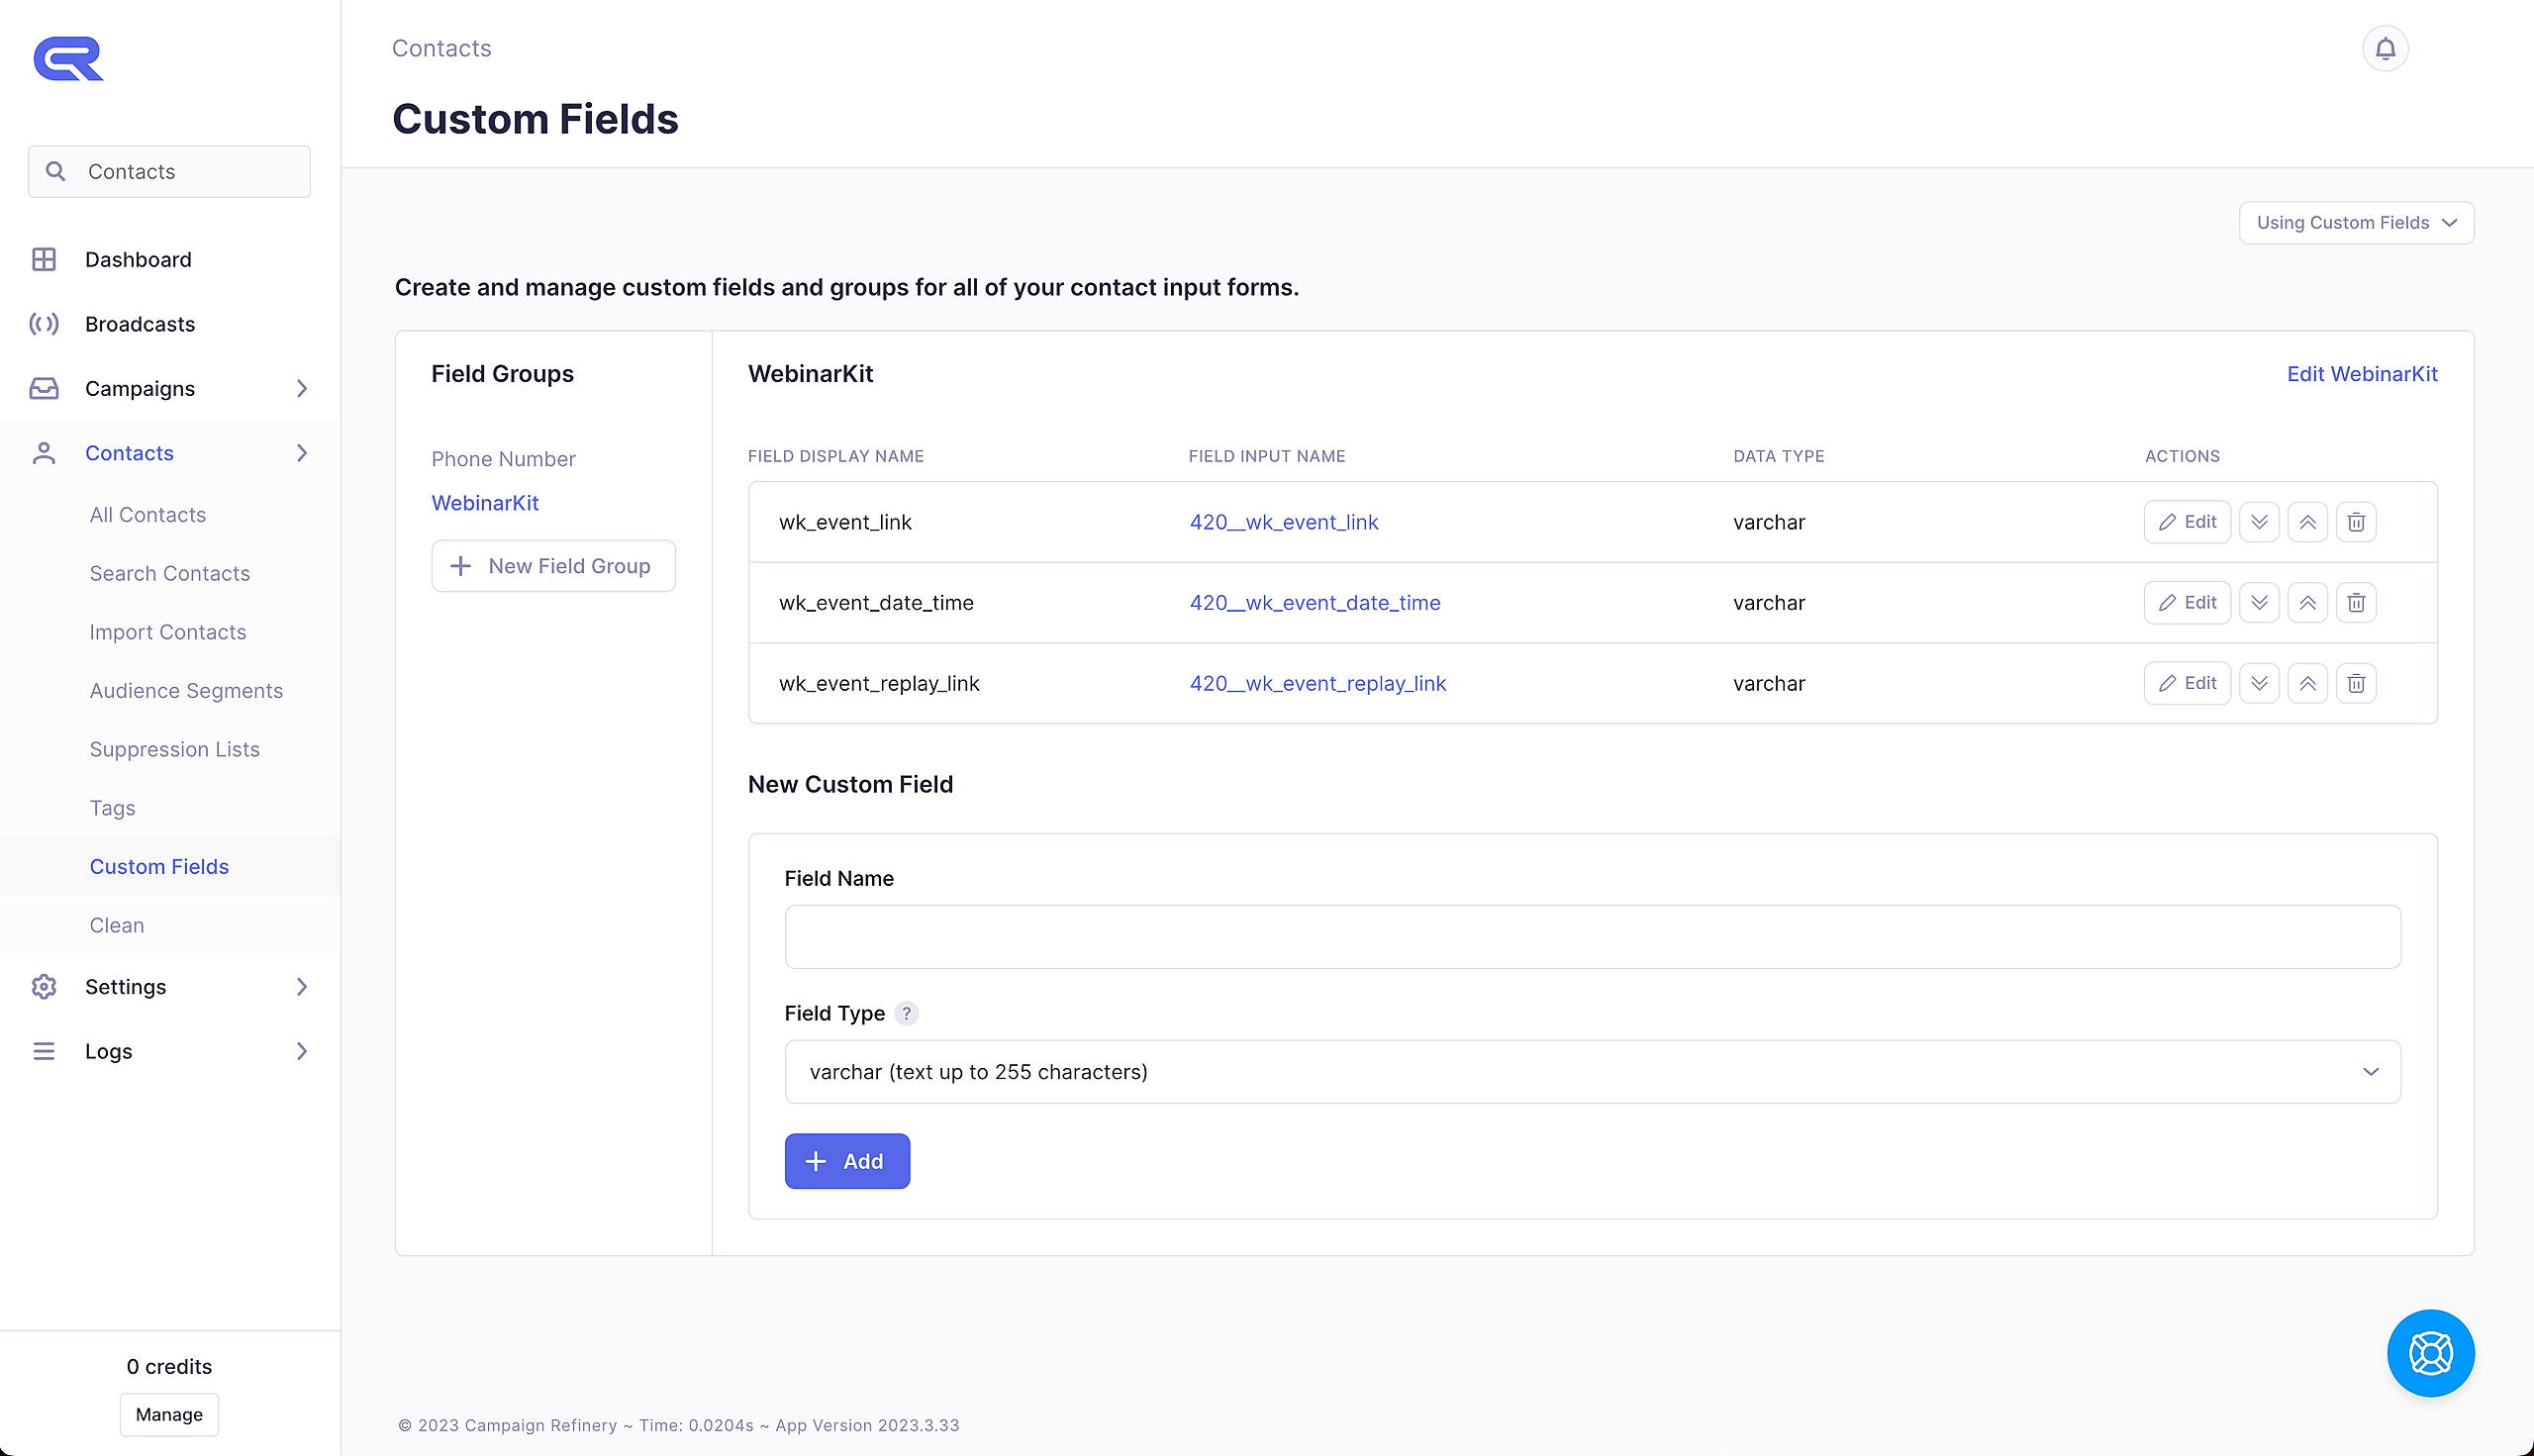
IMPORTANT: In order to receive the registrant's unique event/replay link and event date/time, you MUST add 3 custom fields to your Campaign Refinery account. You must add the following custom fields:
wk_event_link
wk_event_replay_link
wk_event_date_time
Please see the screenshot below for an example of what this should look. The custom fields can belong to any field group but in this example, we have created a WebinarKit field group and added the custom fields to that group.
Constant Contact
WebinarKit's integration with Constant Contact allows you to add event registrants to Contact Contact lists and also optionally tag them based on a large variety of different events (Example: Registered for event, attended/did not attend event, clicked on event offer, etc...).
WebinarKit also sends along the registrant's event/replay link and event date/time.
IMPORTANT: In order to receive the registrant's unique event/replay link and event date/time, WebinarKit will automatically add custom fields to your account when you first set up your integration. From there, you can access the registrant info via the following custom fields in Constant Contact:
wk_event_link
wk_event_replay_link
wk_event_date_time
Please see the screenshots below for an example of what this should look.


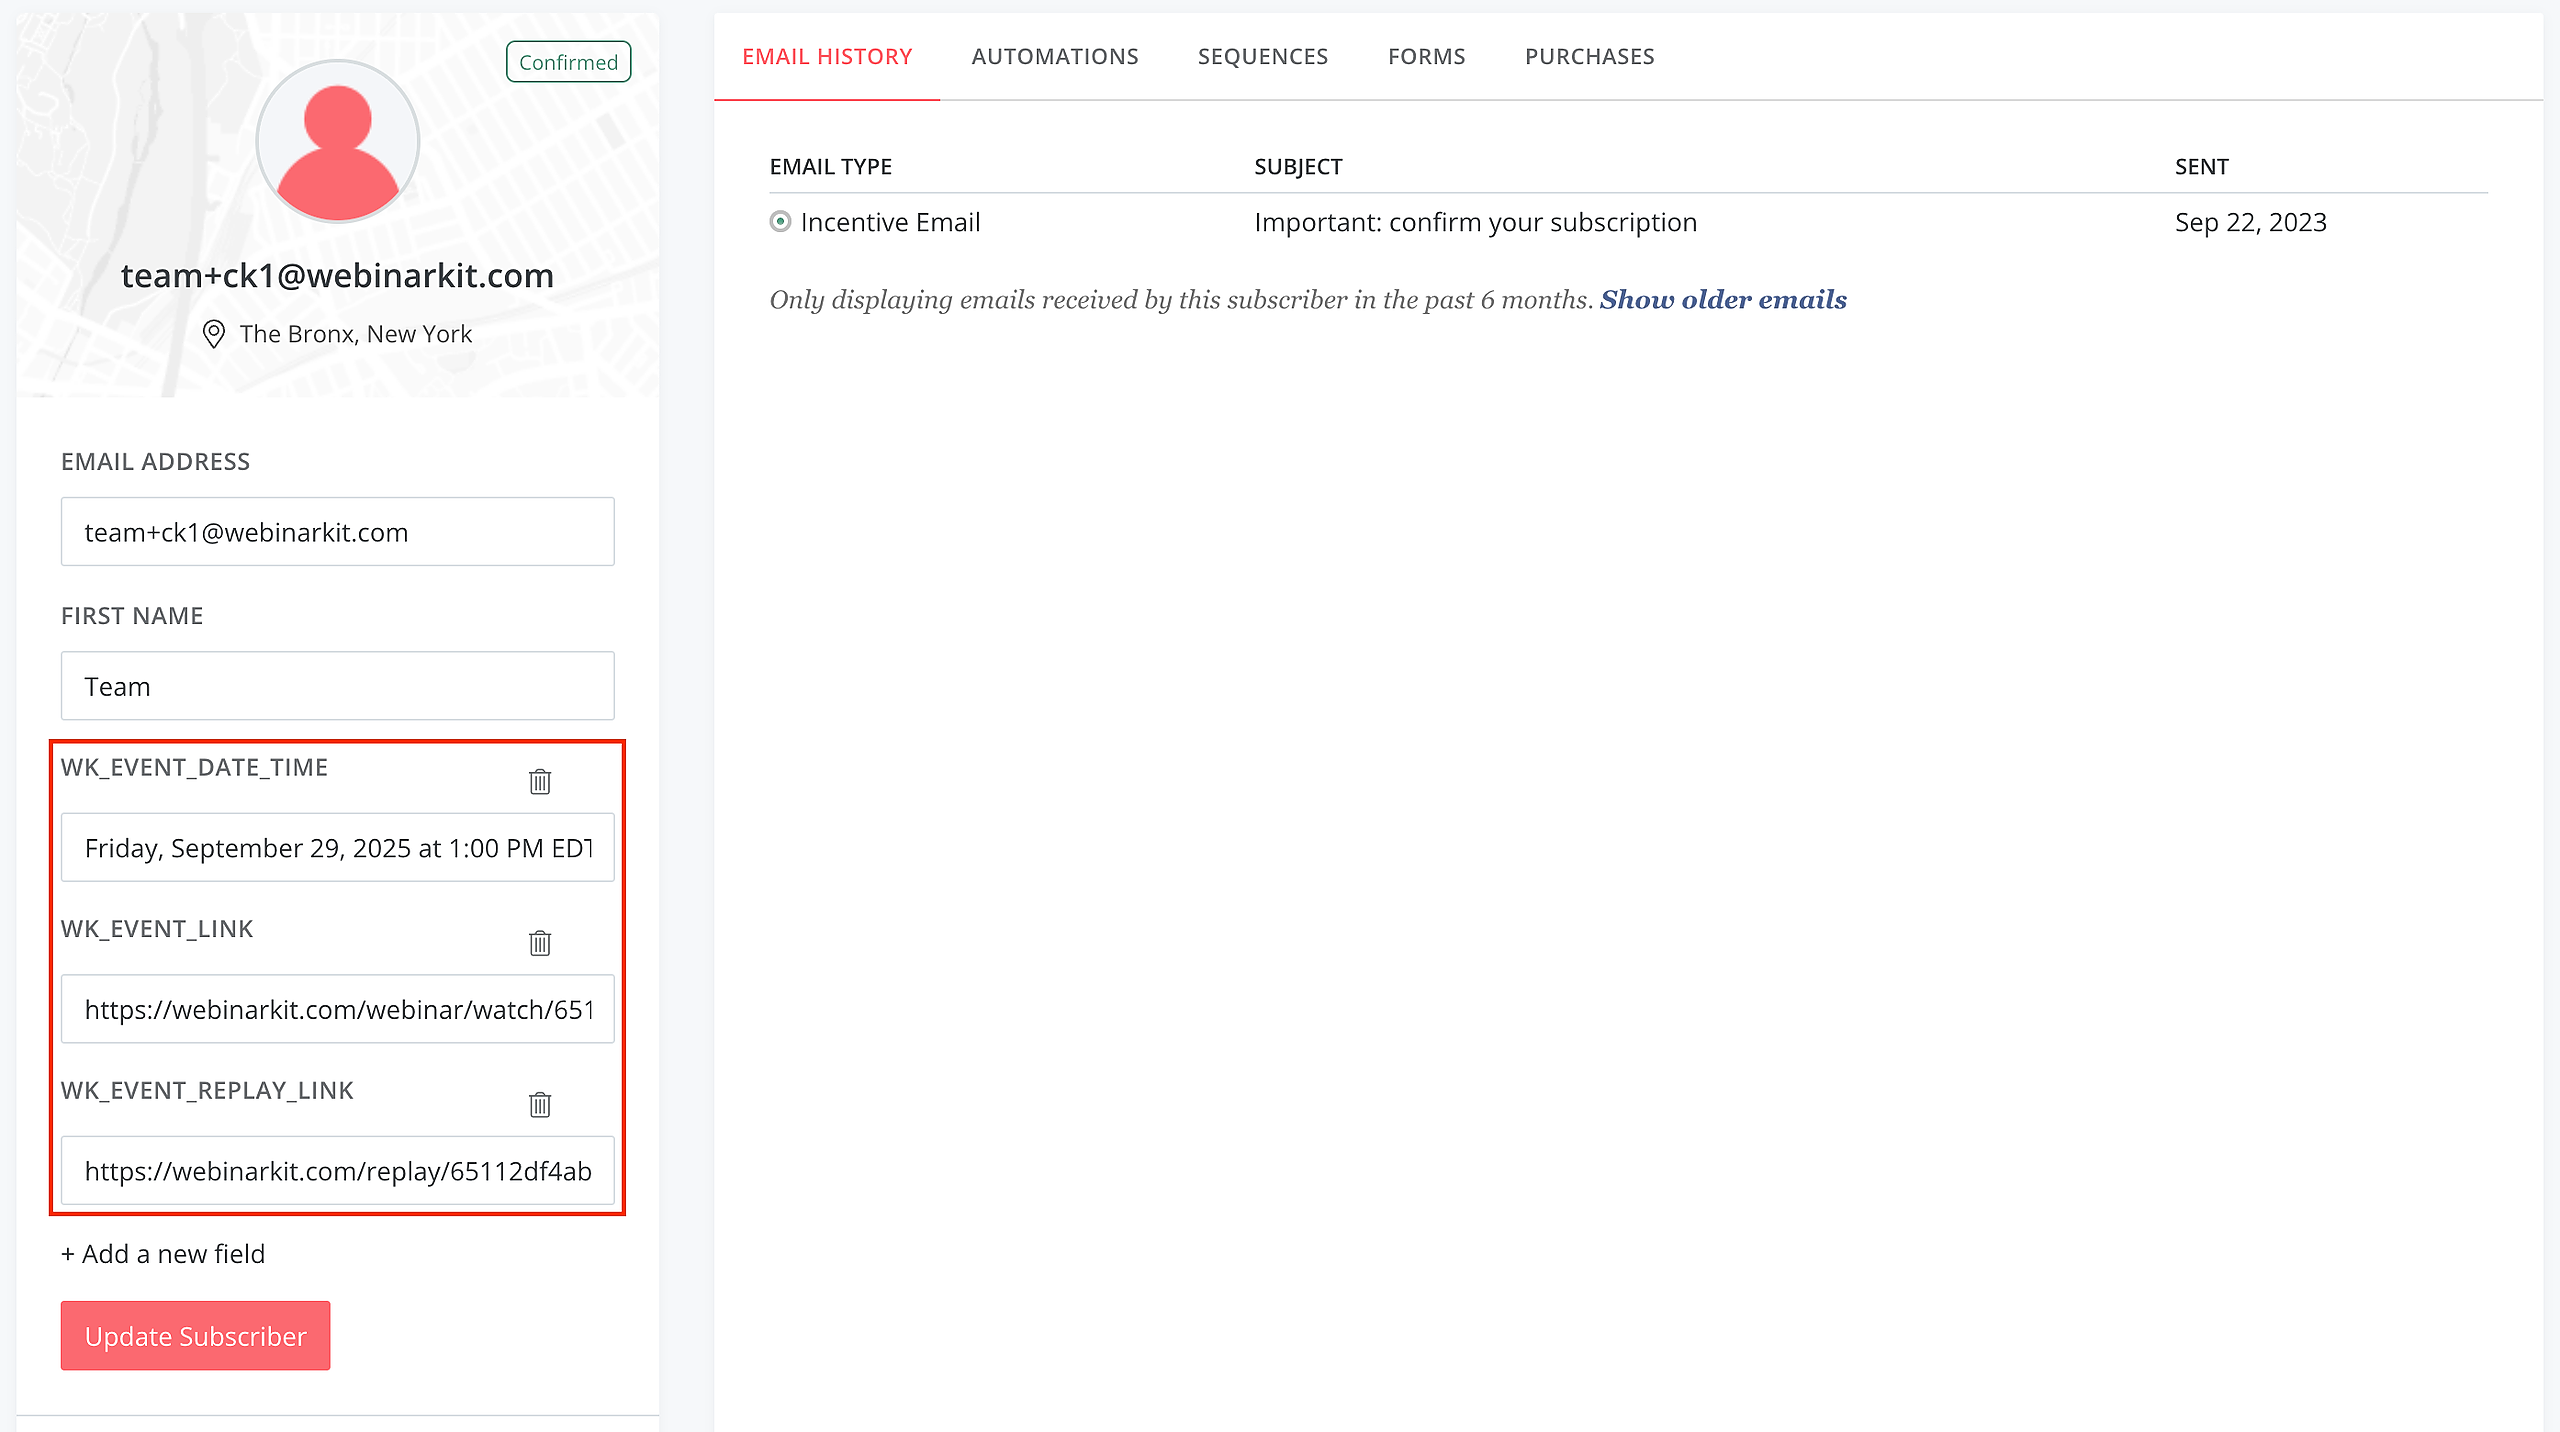
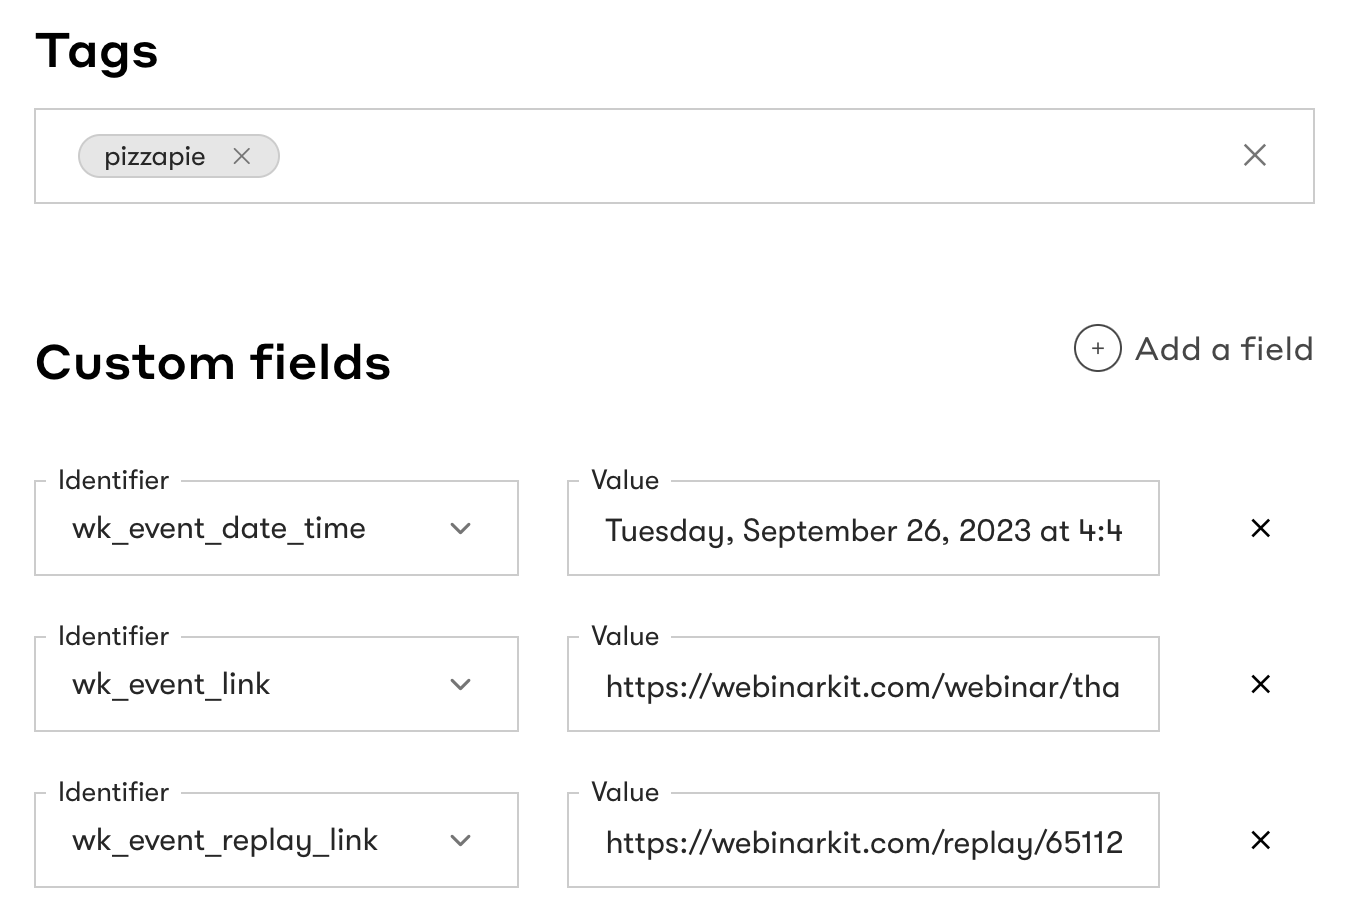
ConvertKit
WebinarKit's integration with ConvertKit allows you to subscribe event registrants to ConvertKit forms and also optionally tag them based on a large variety of different events (Example: Registered for event, attended/did not attend event, clicked on event offer, etc...).
WebinarKit also sends along the registrant's event/replay link and event date/time.
IMPORTANT: In order to receive the registrant's unique event/replay link and event date/time, you MUST add 3 custom fields to your ConvertKit account. You must add the following custom fields:
wk_event_link
wk_event_replay_link
wk_event_date_time
Please see the screenshot below and the "Add a new field" button highlighted in red to see how you can do this:
Also see ConvertKit's article on custom fields here: https://help.convertkit.com/en/articles/2502504-how-to-add-custom-fields-to-subscribers
Drip
WebinarKit's integration with Drip allows you to add event registrants to Drip and tag them based on a large variety of different events (Example: Registered for event, attended/did not attend event, clicked on event offer, etc...).
WebinarKit also sends along the registrant's event/replay link and event date/time. You'll find that info added to each contact in Drip under the following fields:
wk_event_link
wk_event_replay_link
wk_event_date_time
Please see the screenshot below to see an example:
GetResponse
WebinarKit's integration with GetResponse allows you to add event registrants to GetResponse lists and/or apply a tag based on a large variety of different events (Example: Registered for event, attended/did not attend event, clicked on event offer, etc...).
WebinarKit also sends along the registrant's event/replay link and event date/time.
IMPORTANT: In order to receive the registrant's unique event/replay link and event date/time, WebinarKit will automatically add the custom fields to your account when you first set up your integration. From there, you can access the registrant info via the following custom fields in GetResponse:
wk_event_link
wk_event_replay_link
wk_event_date_time
Google Calendar
Coming soon...
HighLevel
WebinarKit supports 2 methods of integrating with HighLevel: The native integration and webhooks. Please see the video below for an overview of both methods.
Using WebinarKit's native HighLevel integration:
WebinarKit's integration with HighLevel allows you to add event registrants to HighLevel accounts based on a large variety of different events (Example: Registered for event, attended/did not attend event, clicked on event offer, etc...). You can tag your contacts and also add your contacts to HighLevel Workflows.
WebinarKit also supports a unique feature with HighLevel which allows you to register new contacts for webinars in your account. You can learn more about this feature here: https://help.webinarkit.com/help/using-webinarkit-s-unique-highlevel-integration
WebinarKit also sends along the registrant's unique event/replay link and their event date & time.
The event date & time is sent in 2 formats: The date as the registrant saw when registering for your event (including the time zone) AND a date timestamp that should be used when working with dates in HighLevel automations and workflows (Using the date timestamp value with the "Set event start date" action in your HighLevel workflow will ensure that any email reminders & texts you send in HighLevel are sent at the correct time).
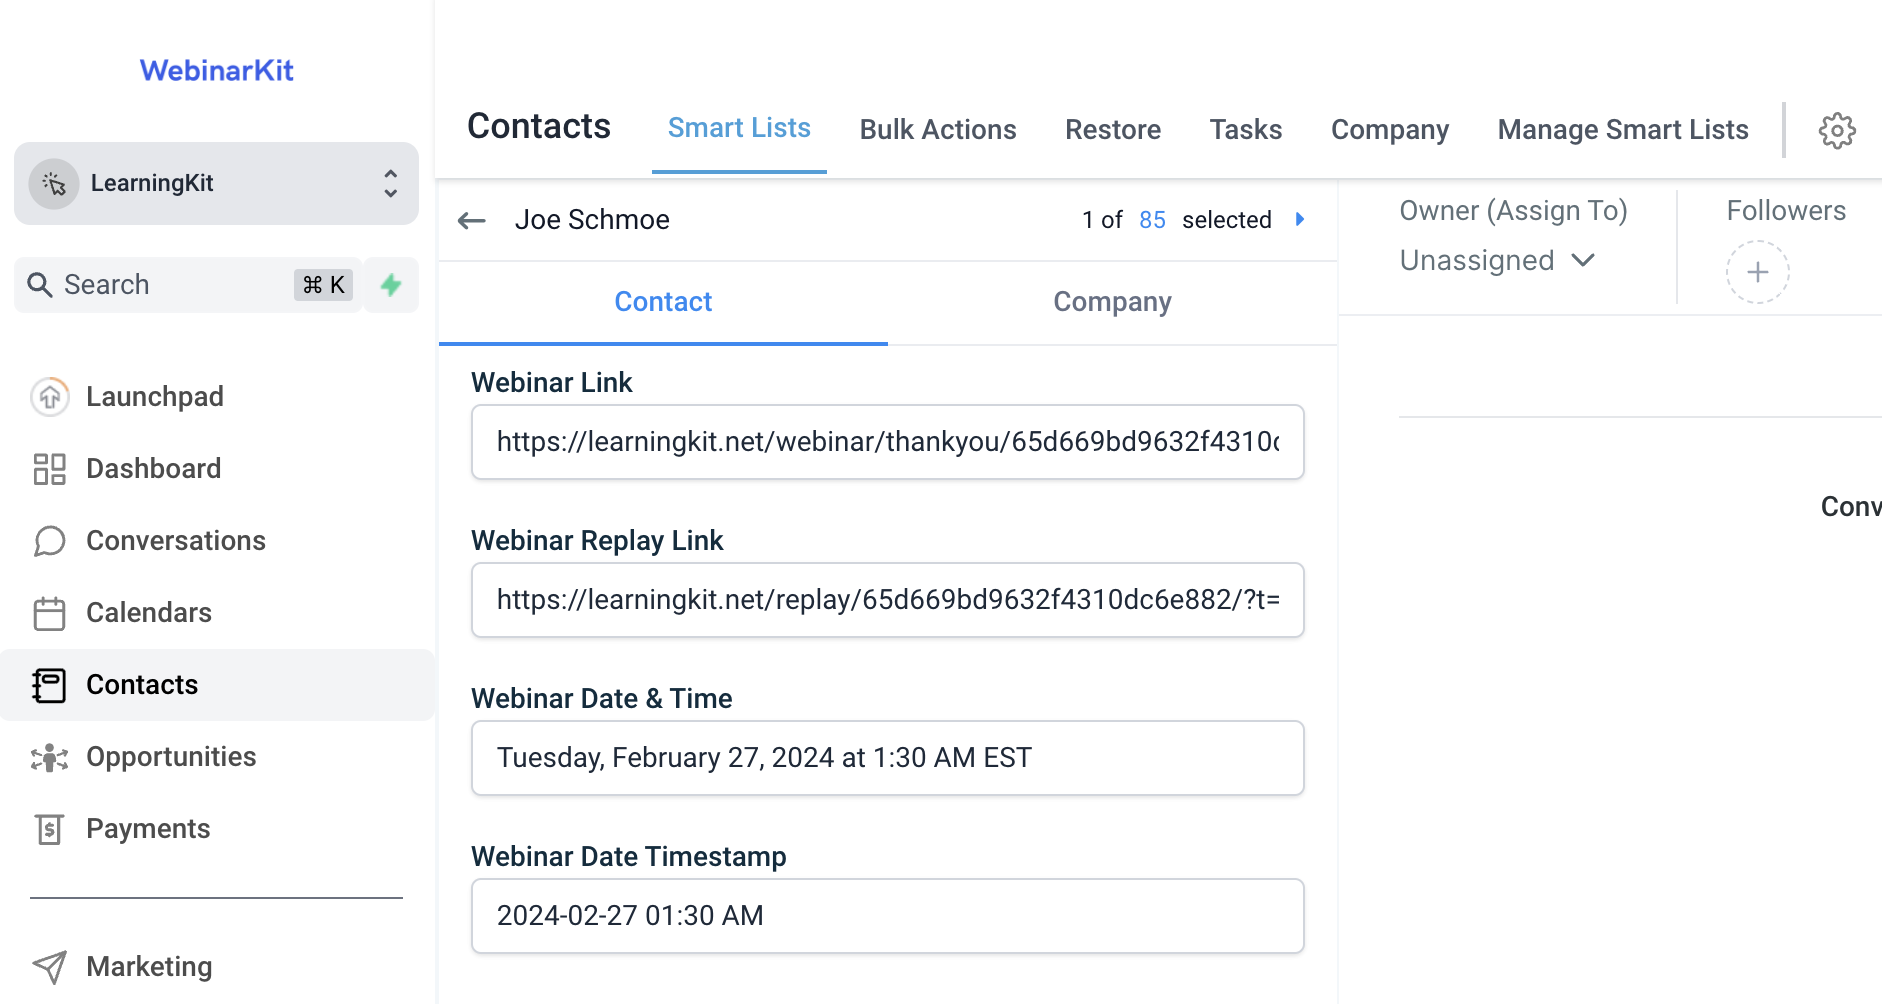
IMPORTANT: In order to receive the registrant's unique event/replay link and event date/time, WebinarKit will automatically add the fields to your account when you first set up your integration. You'll find them in your HighLevel account under the names:
Webinar Link
Webinar Replay Link
Webinar Date & Time
Webinar Date Timestamp
Important: Our HighLevel integration is meant to be used with HighLevel subaccounts only, NOT HighLevel agency accounts.
If you experiencing any issues with our HighLevel integration, check out our dedicated troubleshooting article here:
https://help.webinarkit.com/help/troubleshooting-highlevel-integration-issues
Using WebinarKit's webhooks feature with HighLevel:
Because HighLevel supports receiving webhook messages, you can also use WebinarKit's webhook features to pass registrant data to HighLevel without using our native HighLevel integration.
A potential benefit of using this integration option (as opposed to the native integration) is you don't need to rely on having established a "connection" between the WebinarKit account and the HighLevel subaccount. This can potentially result in more consistent data flow between WebinarKit and HighLevel by bypassing potential issues like the signed in "connection" expiring.
Please see the video below for an in depth video on using WebinarKit webhooks with HighLevel.
Please note: As mentioned in the video above, the "date_h_timestamp" from the webhook is needed to ensure your workflow event start date/time is set correctly. Please refer to the video for further details.
Check out the following article for more general information on using our webhook features: https://help.webinarkit.com/help/using-webinarkit-s-webhooks-feature
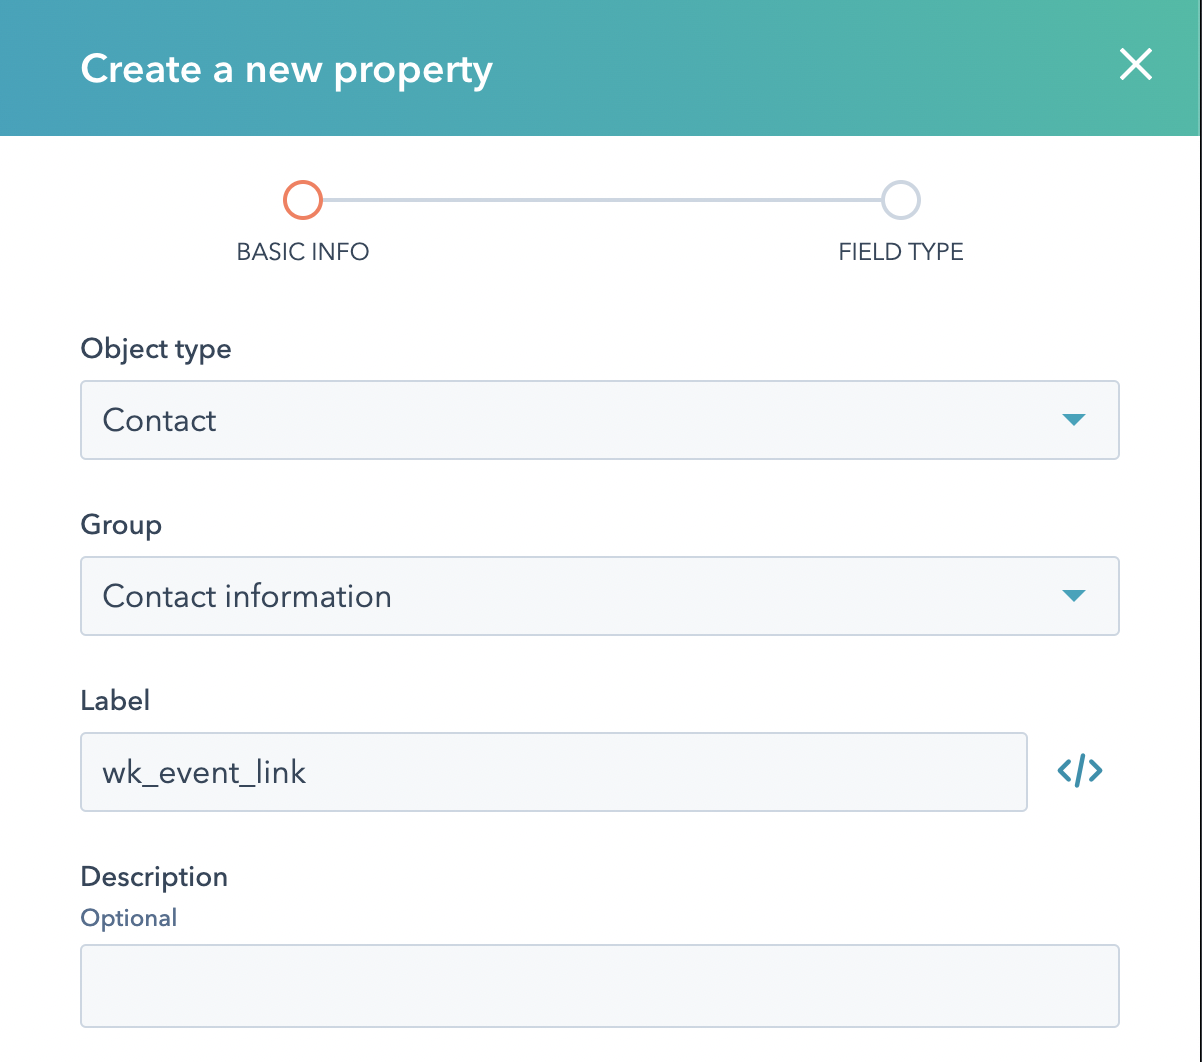
HubSpot
WebinarKit's integration with HubSpot allows you to add event registrants to HubSpot contact lists based on a large variety of different events (Example: Registered for event, attended/did not attend event, clicked on event offer, etc...).
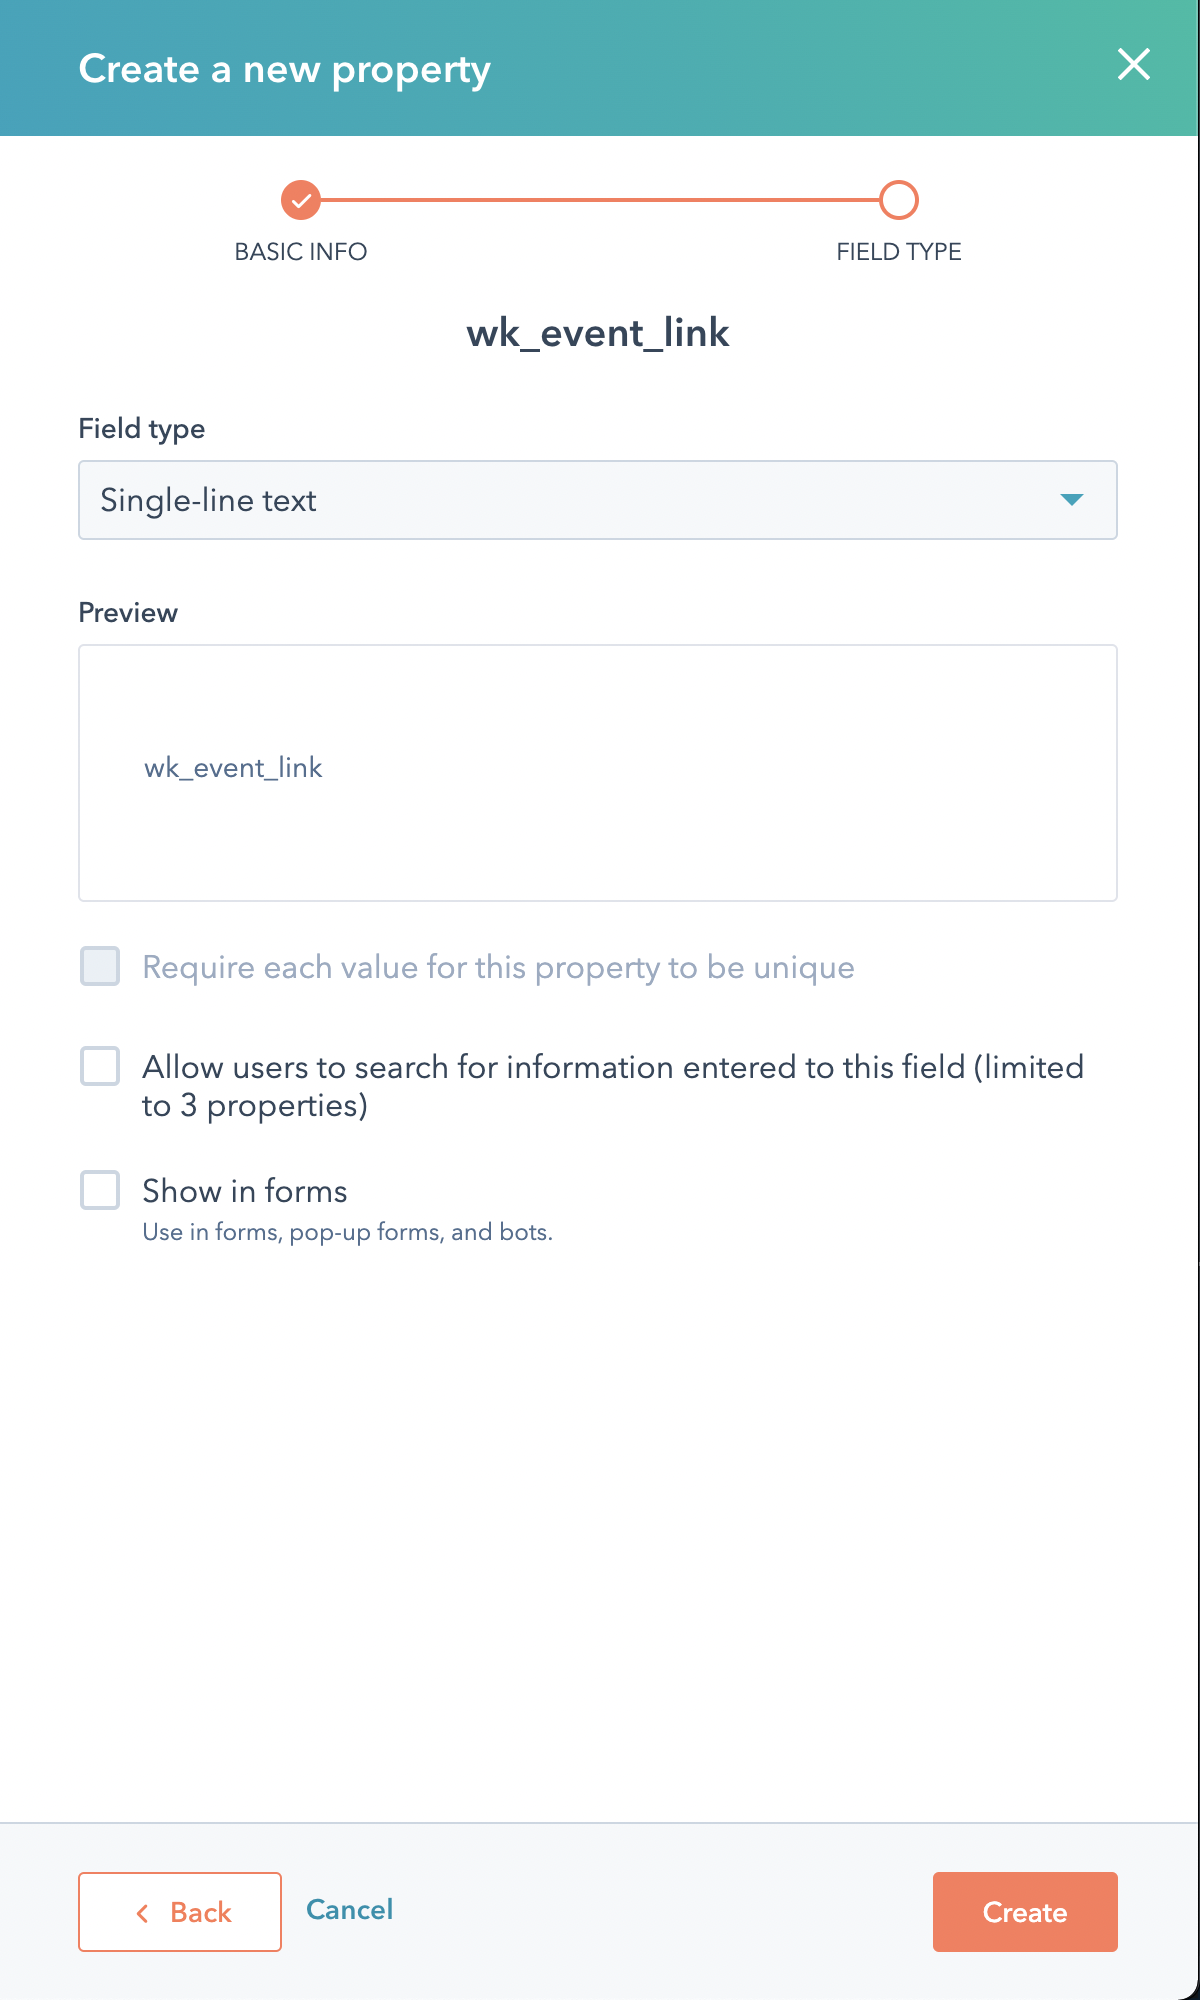
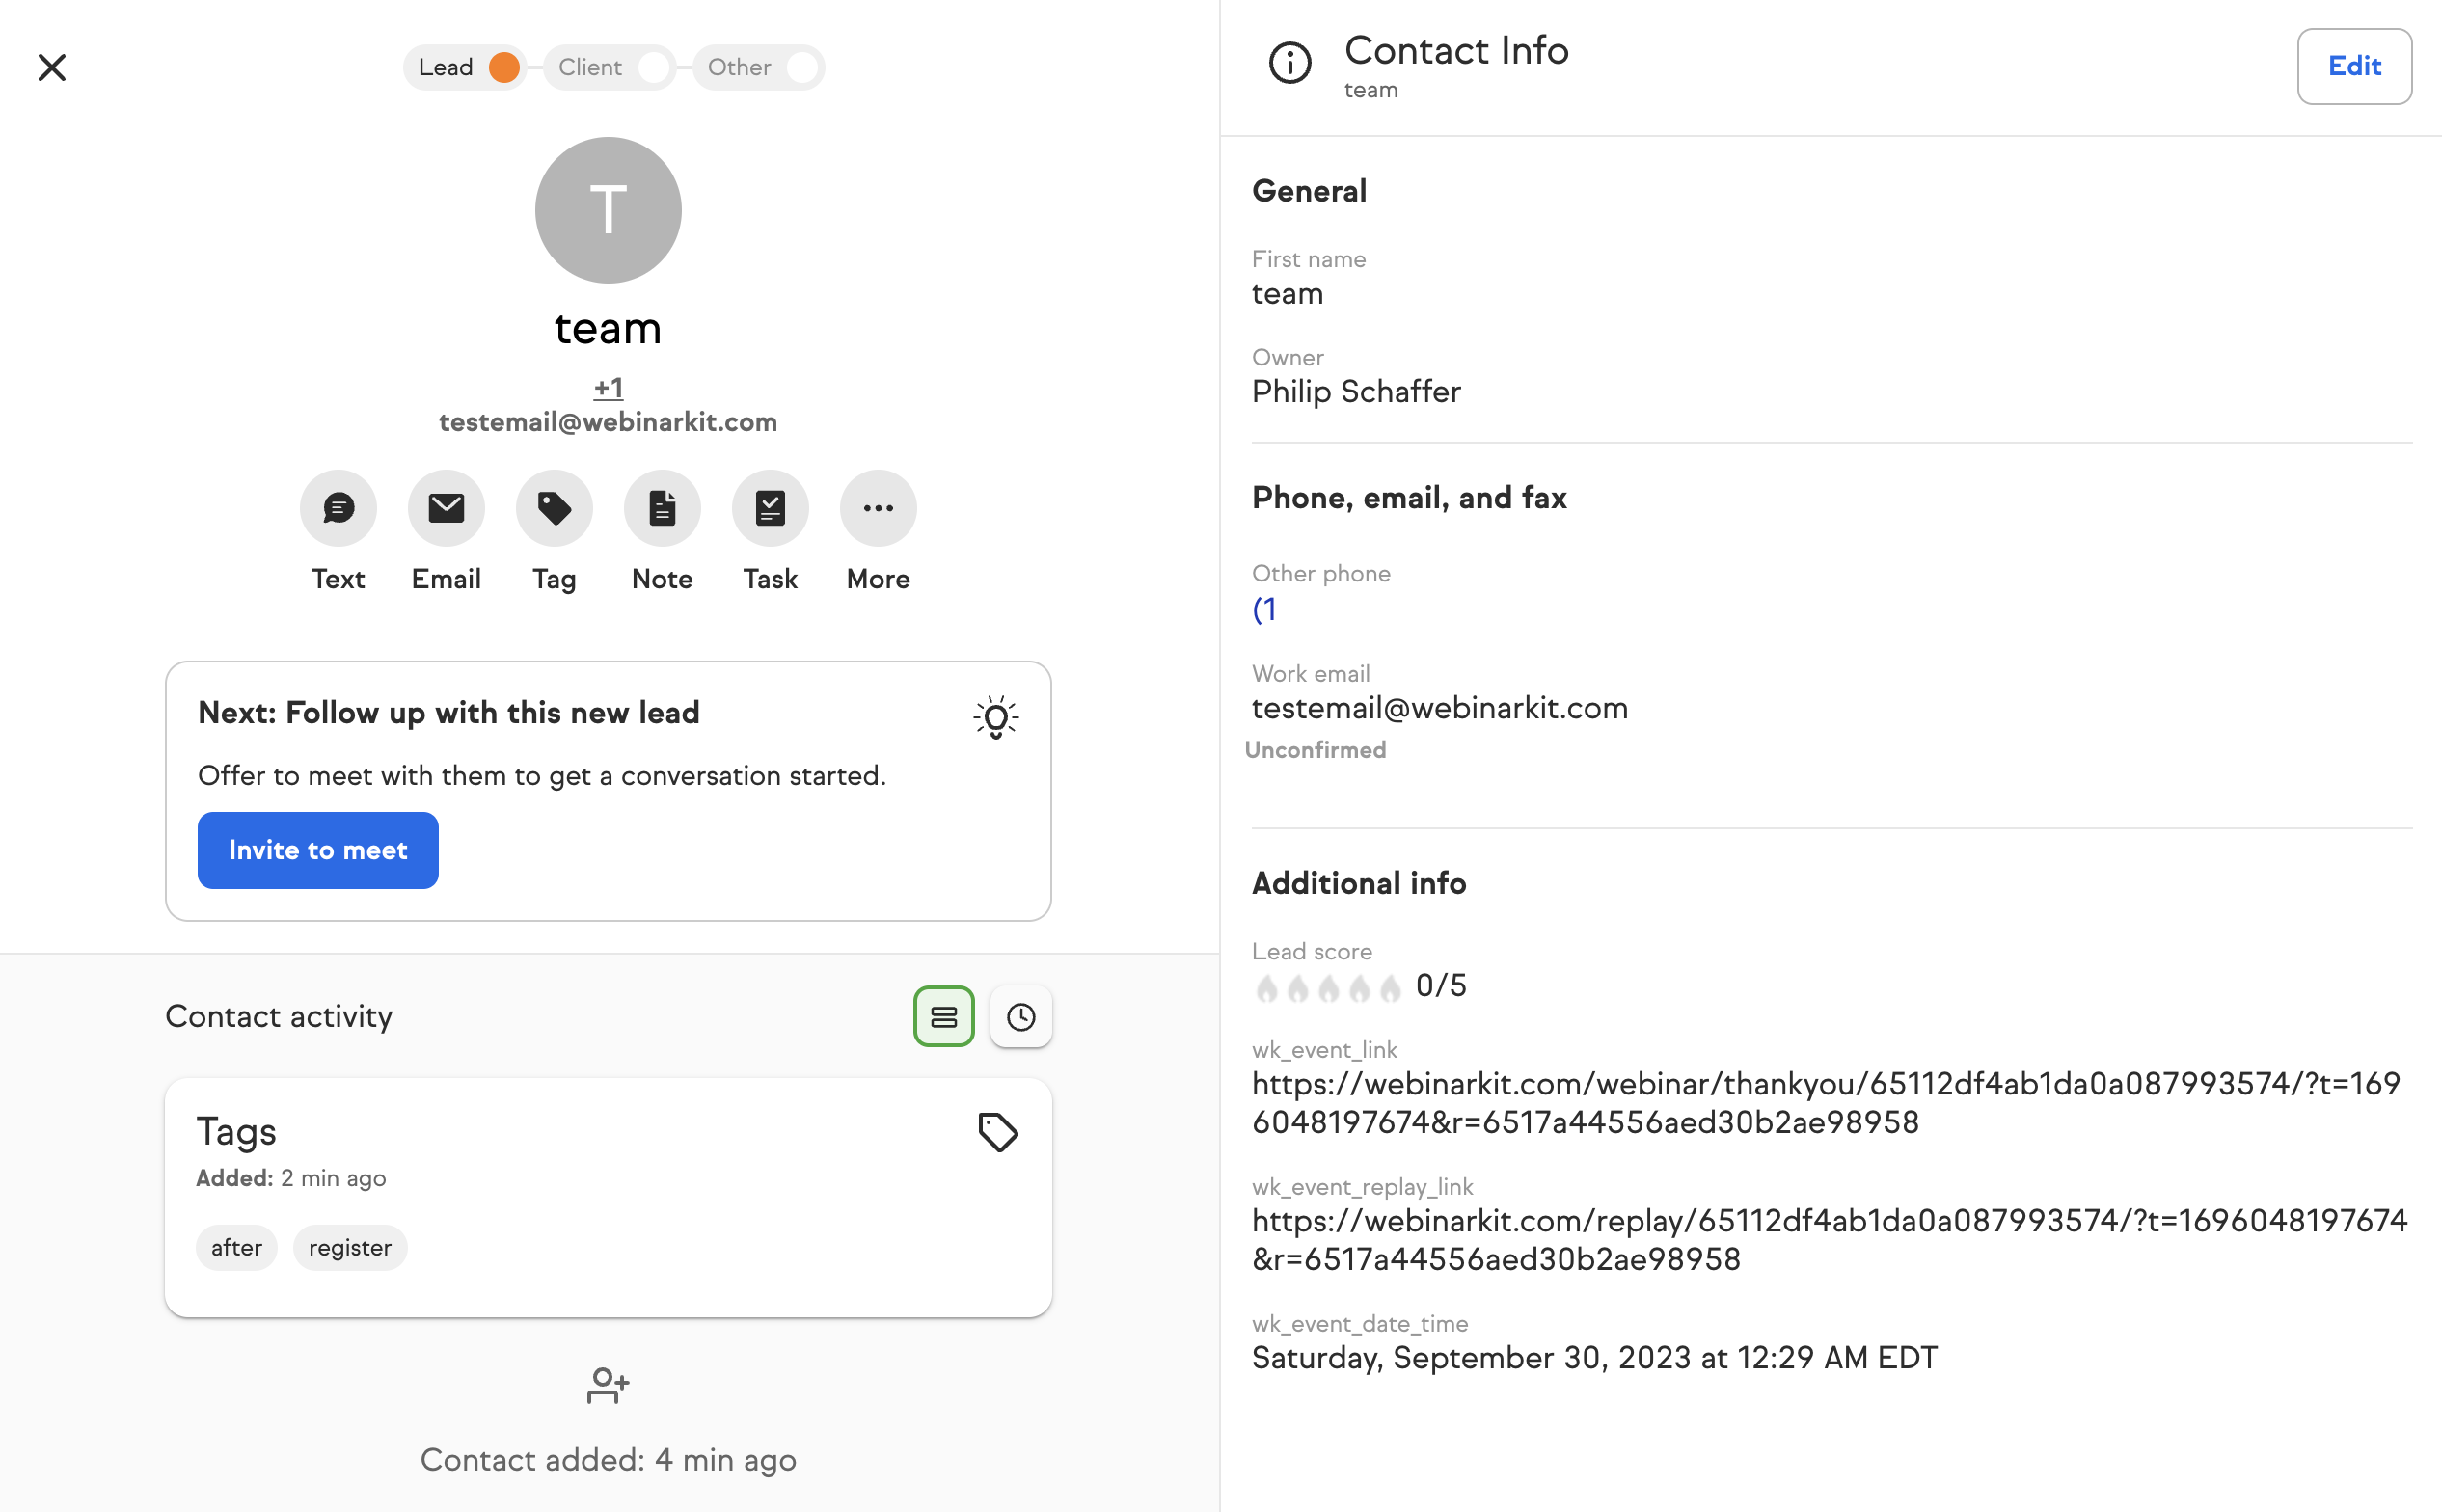
IMPORTANT: In order to receive the registrant's unique event/replay link and event date/time, you MUST add 3 custom properties to your HubSpot account. You must add the following properties:
wk_event_link
wk_event_replay_link
wk_event_date_time
Please see the screenshots below for examples on how to do this:
Keap
WebinarKit's integration with Keap allows you to add event registrants to Keap and tag them based on a large variety of different events (Example: Registered for event, attended/did not attend event, clicked on event offer, etc...).
WebinarKit also sends along the registrant's event/replay link and event date/time. You'll find that info added to each contact in Keap under the following fields:
wk_event_link
wk_event_replay_link
wk_event_date_time
Please see the screenshot below to see an example:
MailChimp
WebinarKit's integration with MailChimp allows you to add event registrants to MailChimp lists and also optionally apply a tag based on a large variety of different events (Example: Registered for event, attended/did not attend event, clicked on event offer, etc...).
WebinarKit also sends along the registrant's event/replay link and event date/time.
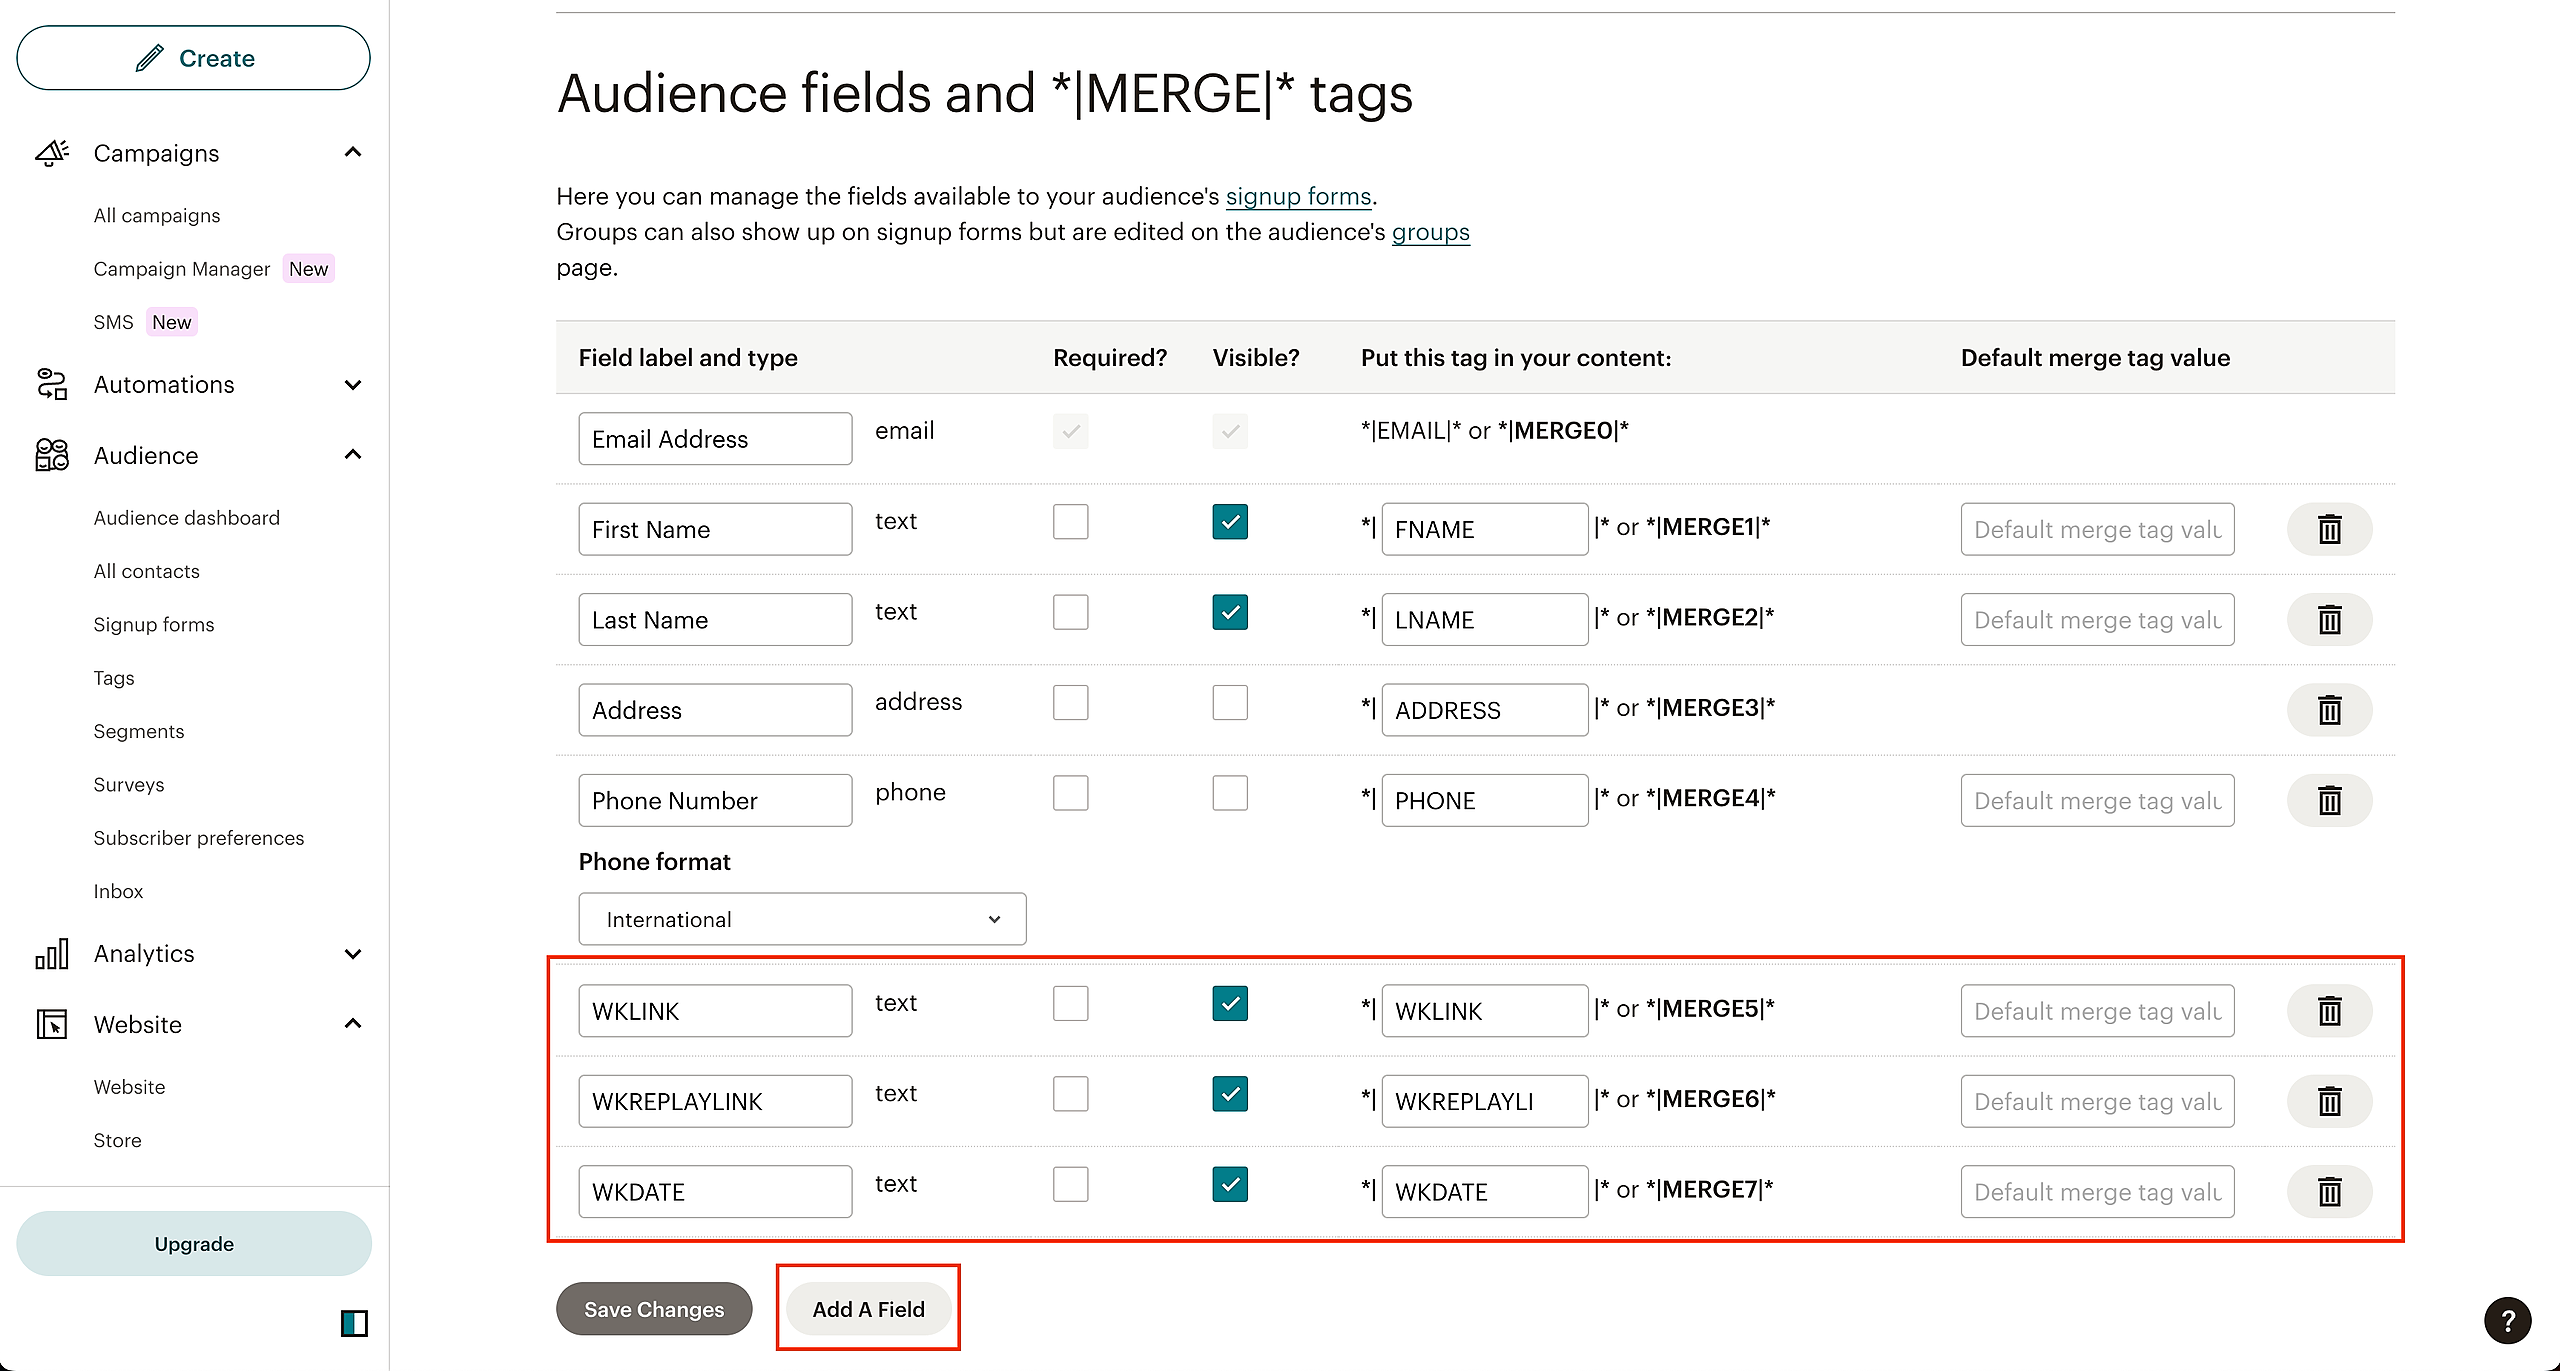
IMPORTANT: In order to receive the registrant's unique event/replay link and event date/time, you MUST add 3 merge fields to the MailChimp audiences you are using. The merge fields must be named the following:
WKLINK
WKREPLAYLINK
WKDATE
You must add the merge fields in your MailChimp audience settings as shown in the screenshot below. The relevant sections are highlighted in red.
Please see MailChimp's merge fields article here for more information on using the registrant's event link and event date/time in your emails: https://mailchimp.com/help/getting-started-with-merge-tags/
MailerLite
WebinarKit's integration with MailerLite allows you to add event registrants to MailerLite groups based on a large variety of different events (Example: Registered for event, attended/did not attend event, clicked on event offer, etc...).
WebinarKit also sends along the registrant's event/replay link and event date/time.
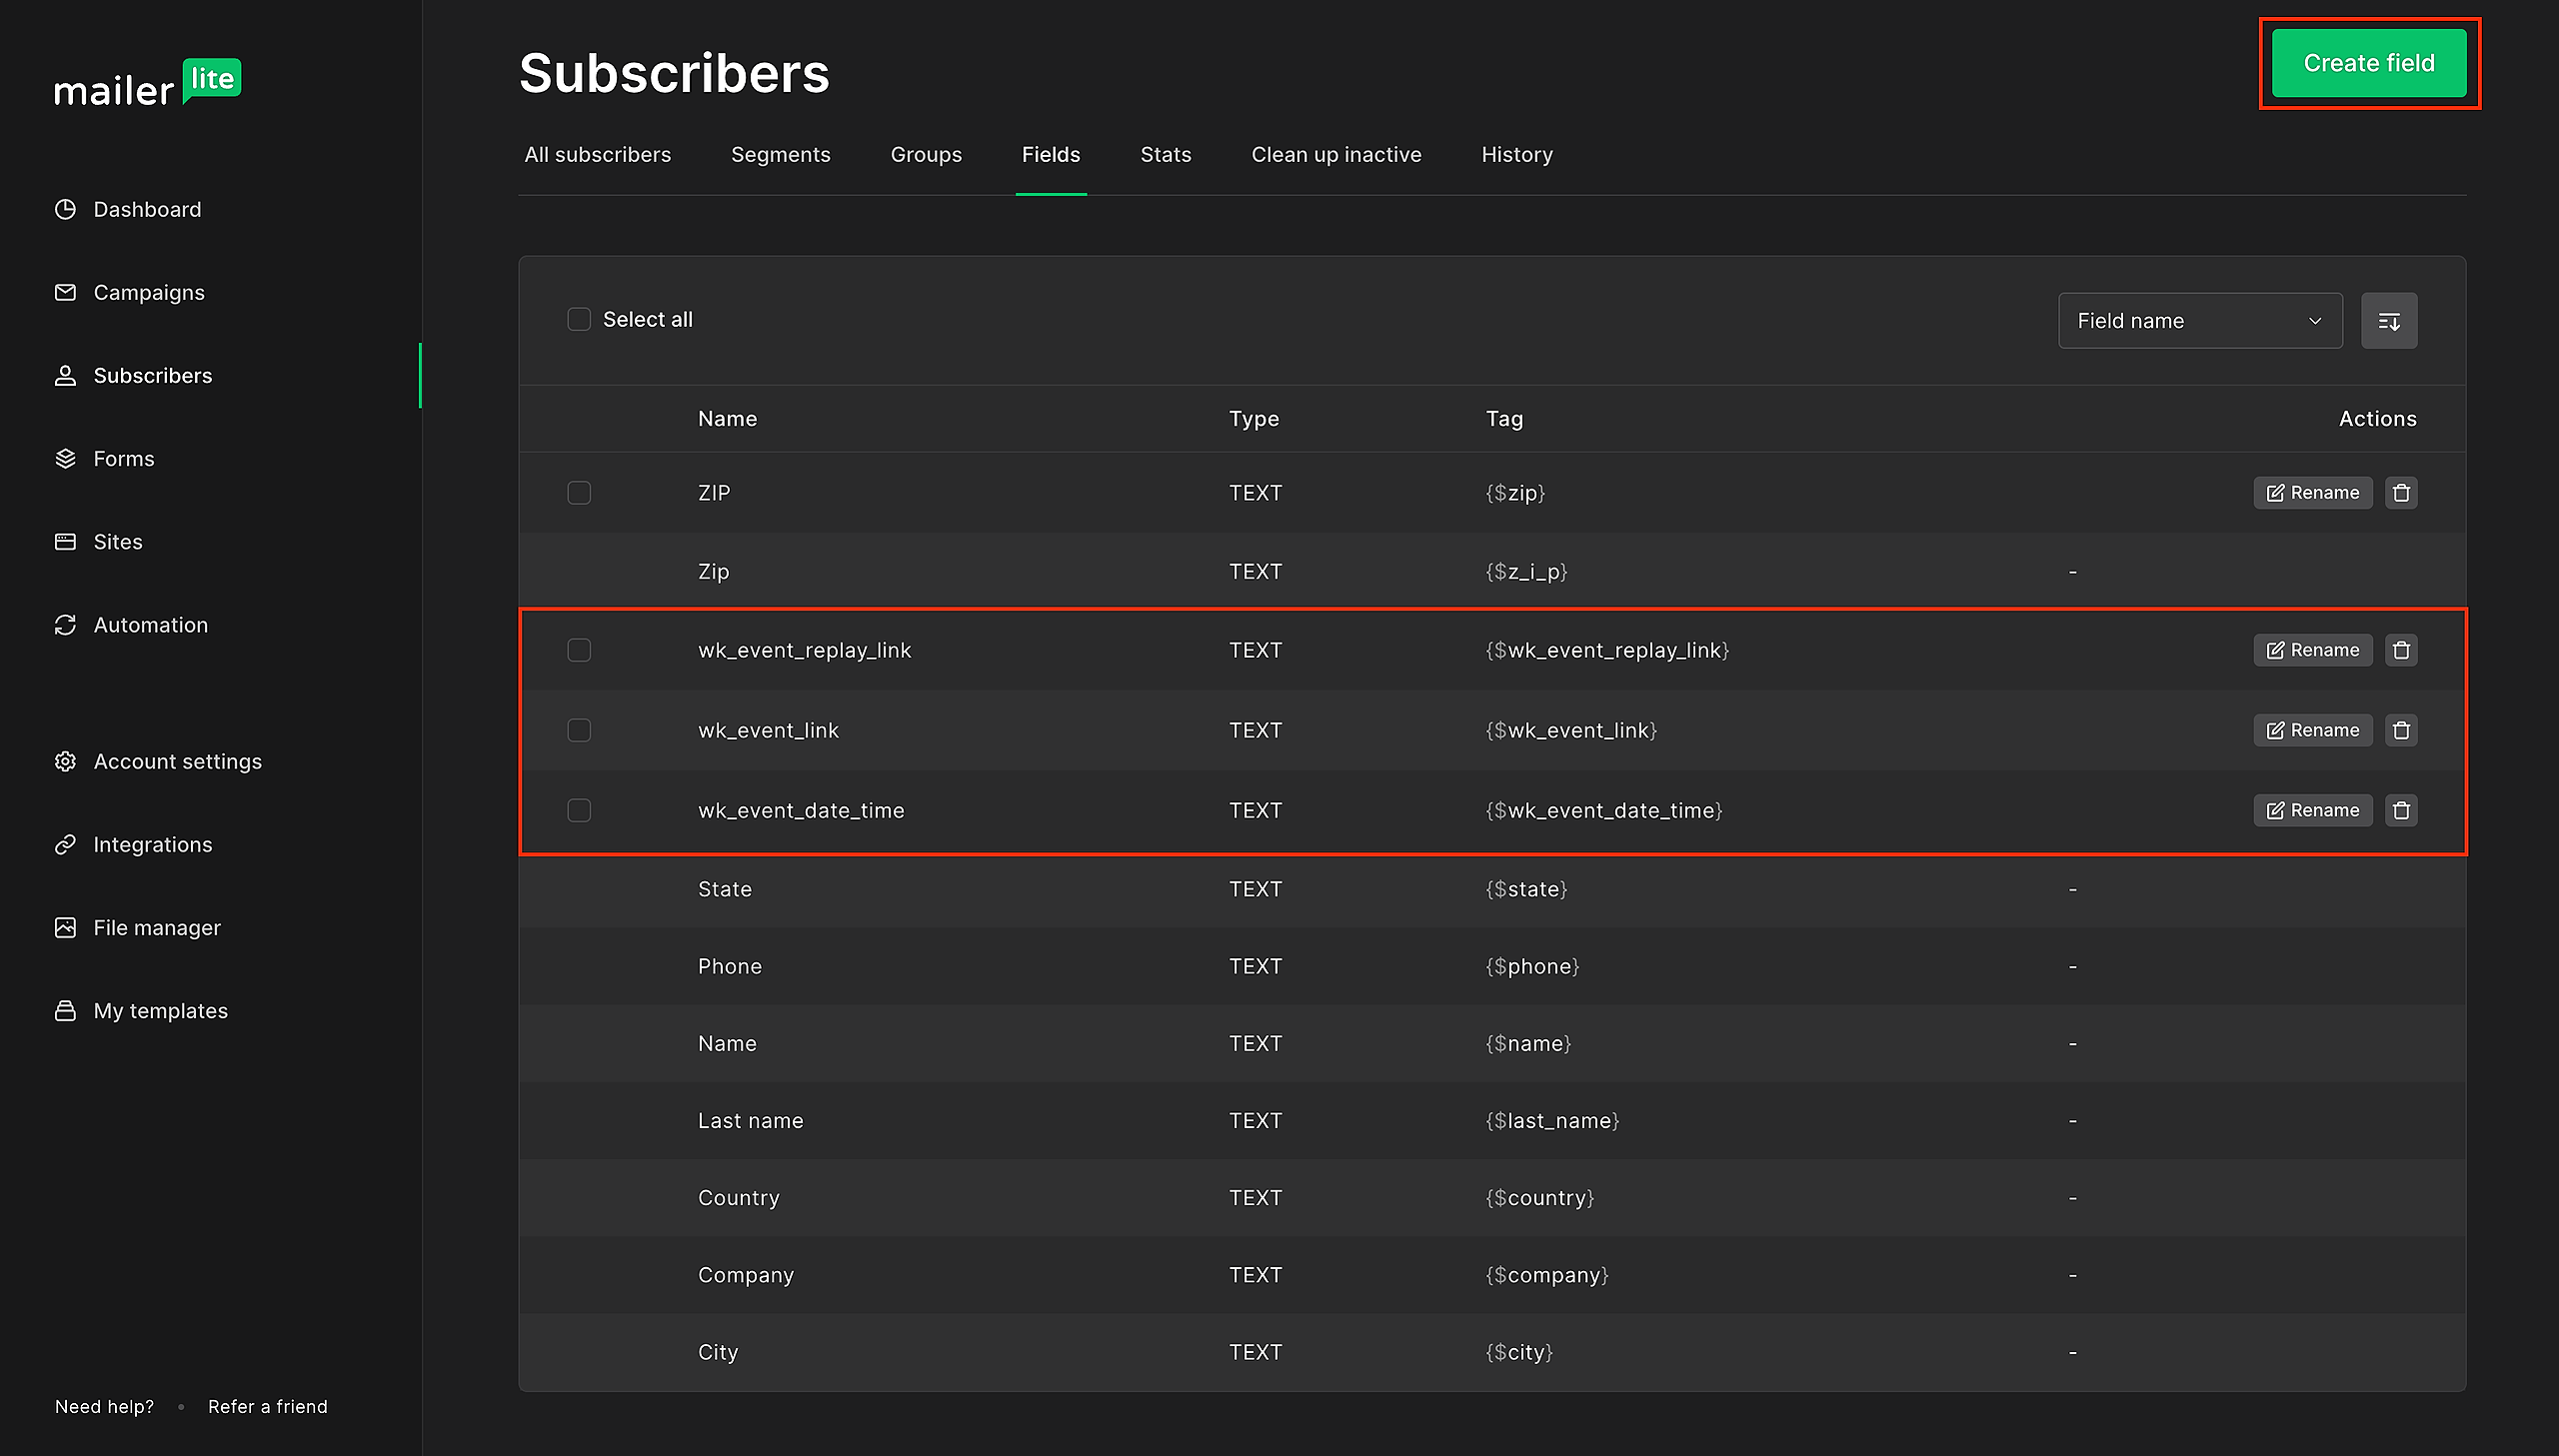
IMPORTANT: In order to receive the registrant's unique event/replay link and event date/time, you MUST add 3 custom fields to your MailerLite account. You must add the following custom fields:
wk_event_link
wk_event_replay_link
wk_event_date_time
Please see the screenshots below on how to do this:
SendFox
WebinarKit's integration with SendFox allows you to add event registrants to SendFox lists based on a large variety of different events (Example: Registered for event, attended/did not attend event, clicked on event offer, etc...).
Unfortunately, SendFox does not currently support custom fields so WebinarKit cannot send along the registrant's event/replay link and event date/time at this time. If you need the event link and/or date time, you may want to look into our Zapier integration.
Sendlane
WebinarKit's integration with Sendlane allows you to subscribe event registrants to Sendlane lists and also optionally tag them based on a large variety of different events (Example: Registered for event, attended/did not attend event, clicked on event offer, etc...).
WebinarKit also sends along the registrant's event/replay link and event date/time.
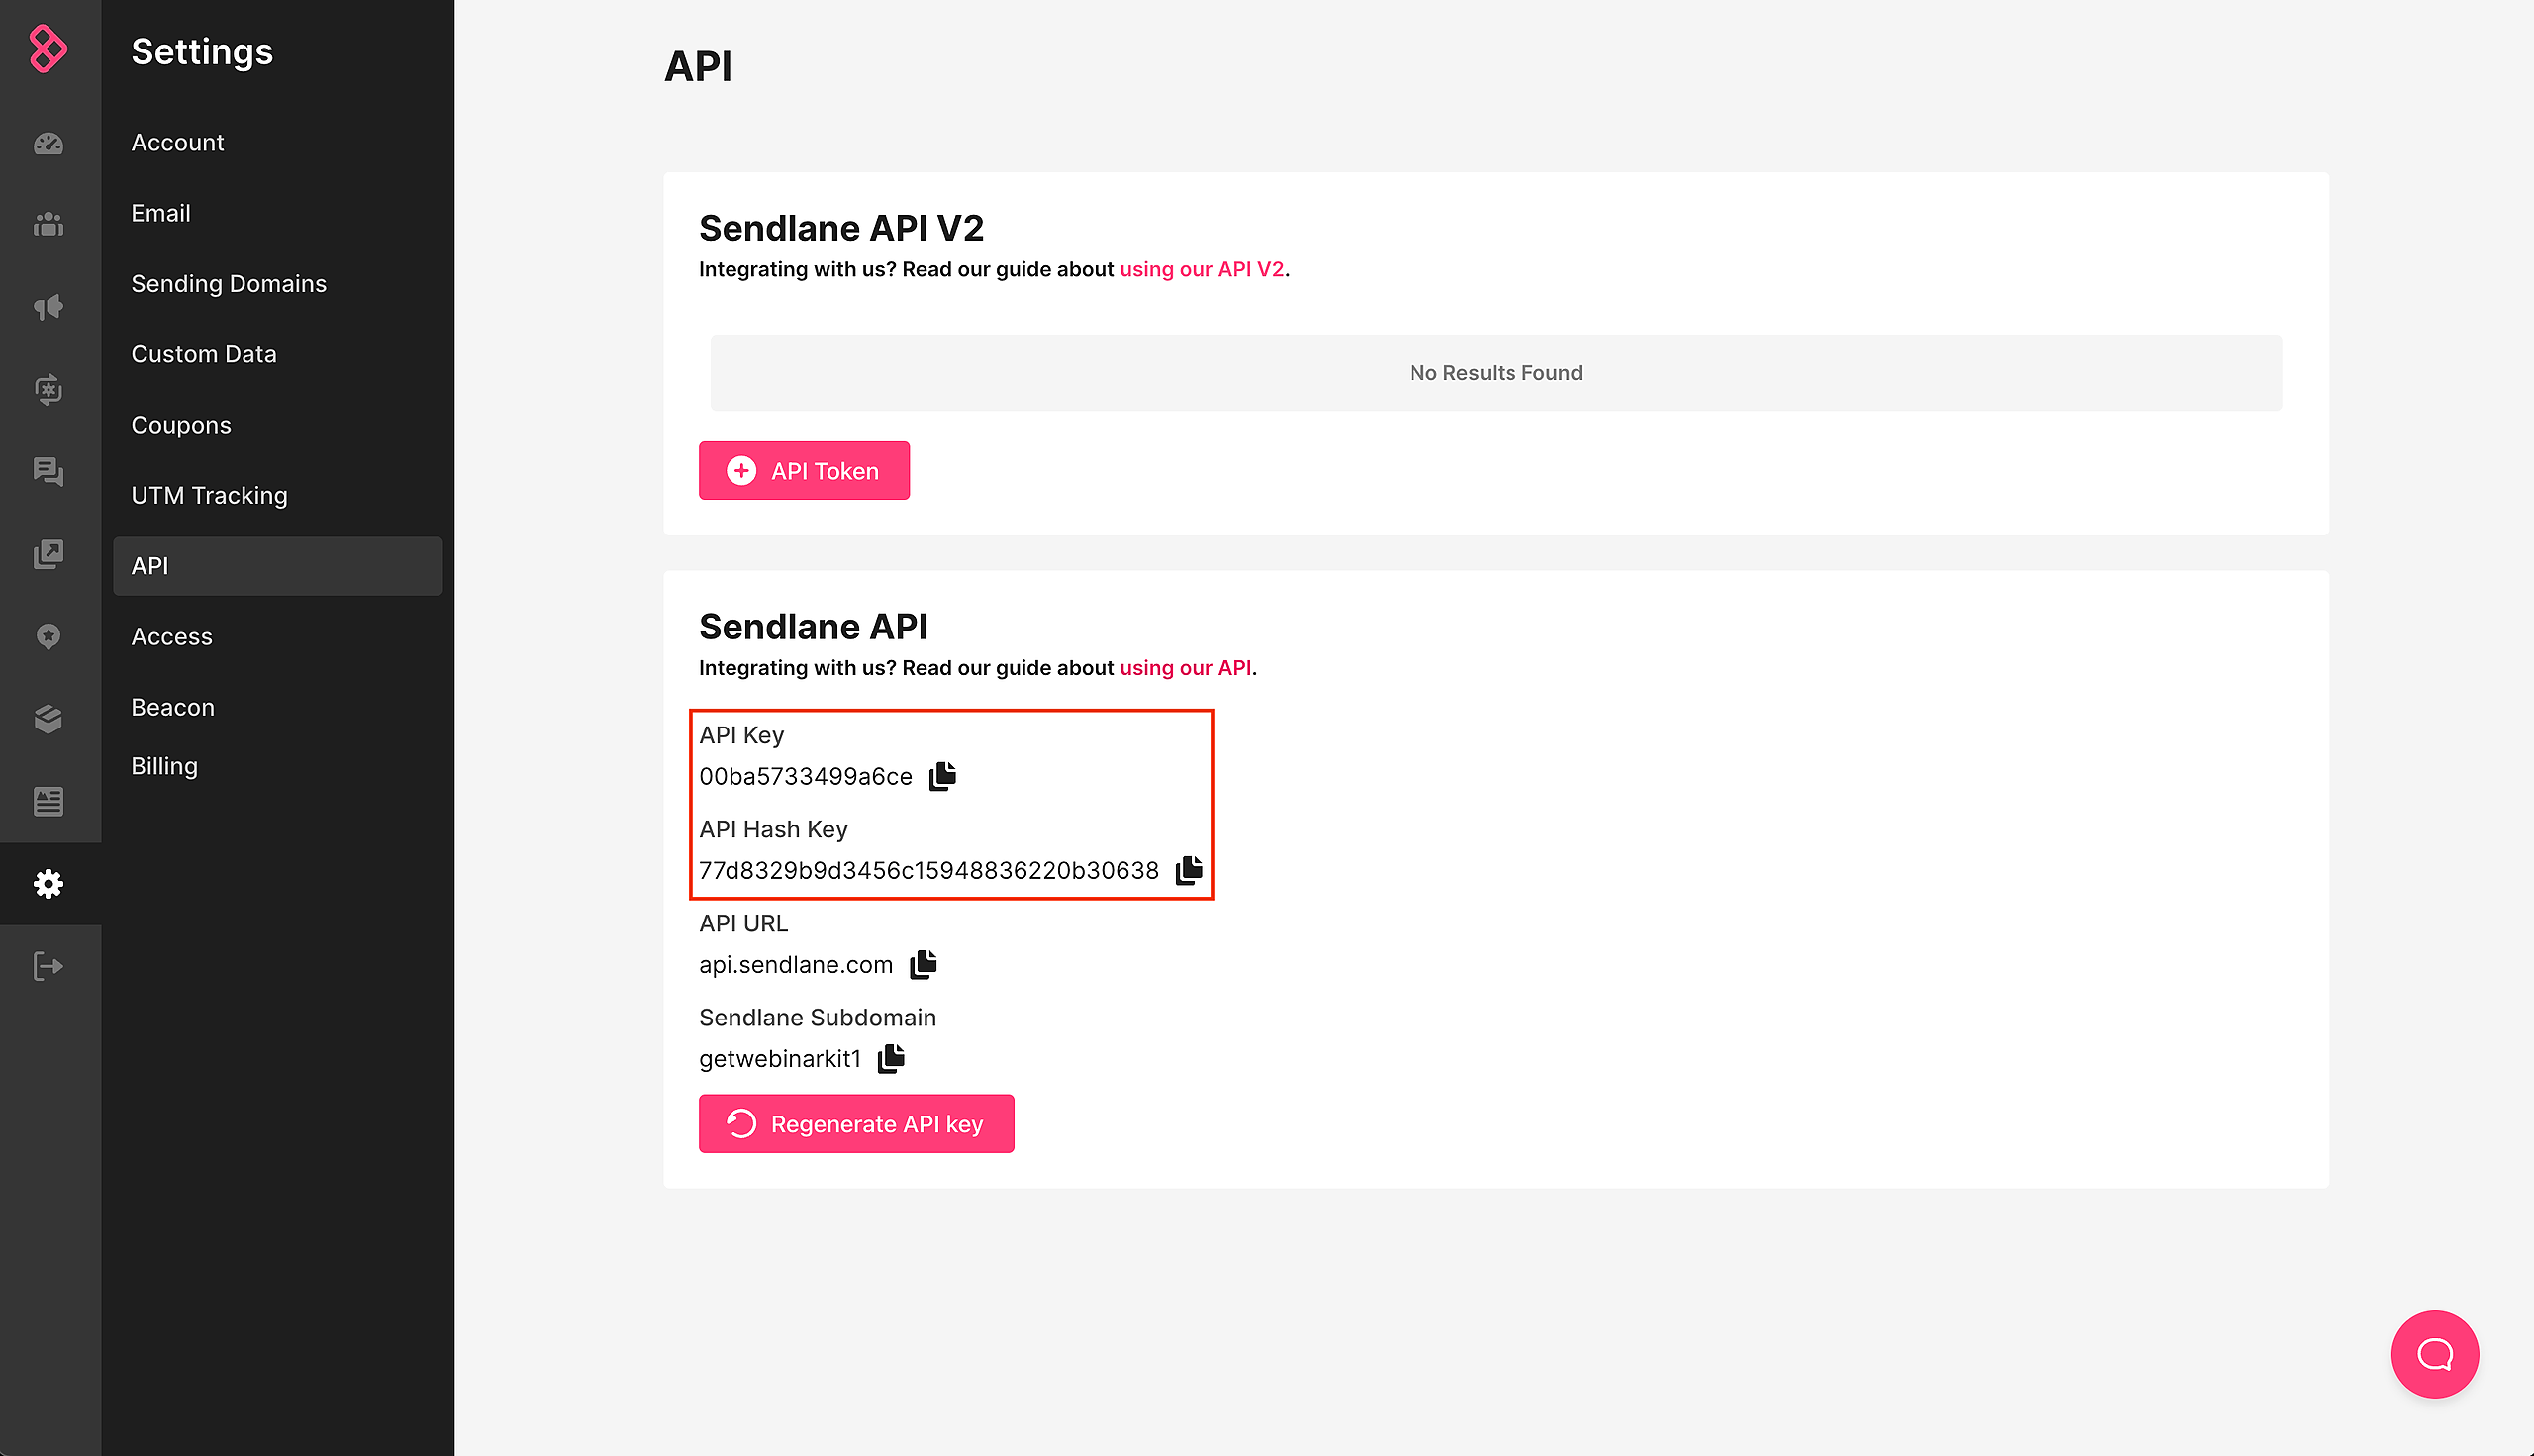
In order to connect your WebinarKit account to your Sendlane account, you must add your Sendlane "API Key" and "API Hash Key" under the Sendlane section on the WebinarKit settings page.
IMPORTANT: In order to receive the registrant's unique event/replay link and event date/time, you MUST add 3 custom fields to your Sendlane account. You must add the following custom fields:
wk_event_link
wk_event_replay_link
wk_event_date_time
Please see the screenshot below and the sections highlighted in red to see how you can do this:

Zapier
WebinarKit's integration with Zapier allows you to send AND receive data from thousands of different applications. Check out our full tutorial on using Zapier with WebinarKit here: https://help.webinarkit.com/help/how-to-integrate-webinarkit-with-zapier